Please visit our new TrackAbout Knowledge Base at https://supportkb.trackabout.com for the most-up-to-date documentation on TrackAbout and TrackAbout Mobile.
Smartphone Vendor-Specific Help
Always Check for Updates First
Before seeking help, please ensure your device is running the latest version of:
- Vendor-provided Android or iOS operating system and firmware patches
- The TrackAbout app
- Latest/greatest version of any third-party software such as DataWedges.
Zebra
Android devices from this vendor having built-in barcode or RFID scanners depend on a separate pre-installed app called DataWedge.
DataWedge is used to configure the scanner settings and needs to be configured properly to work with TrackAbout.
- Install the TrackAbout app before proceeding
- Launch Zebra DataWedge
- Click the menu button a (third button on the bottom on the phone, next to Home)
- Choose "New profile"
- Enter "TrackAbout" and press OK
- Tap on the TrackAbout entry
- Set the following settings:
- Profile enabled: checked
- Associated apps: click and press the menu button, then "New app/activity". Select com.trackabout.mono (look for the TrackAbout icon), then select the first item, *
- Enabled under Barcode Input: checked
- Scan Params (Possibly under Scanner Configuration) - Decode Audio Feedback: Silent (it may read Silent, go in and set it to Silent or None again)
- Scan Params (Possibly under Scanner Configuration) - Decode Haptic Feedback: unchecked
- Enabled under Keystroke Output: unchecked
- Enabled under Intent Output: checked
- Intent action: com.trackabout.motoscan
- Intent category: scan
- Intent delivery: Broadcast intent
- Enabled under IP Output: unchecked
Once the Data Wedge profile has been configured, the TAM7 app needs to be configured to use the hardware scanner. To do this, see: Smartphone App#Enabling Integrated Scanning Hardware
Zebra General Troubleshooting
- Make sure your devices are updated with the latest vendor-provided operating system and firmware. Please consult your Zebra vendor and device documentation.
Cognex
Make sure the Cognex device is on the latest firmware and configured to scan for either iOS or Android. Please consult your Cognex vendor and device documentation.
For iOS, install the Cognex Quick Setup app https://itunes.apple.com/us/app/cognex-quick-setup/id978679507
For Android, install the Cognex MX Connect app https://play.google.com/store/apps/details?id=com.cognex.mxconnect
If scanning stops working, swipe away or otherwise force-quit the TrackAbout app and try again.
If that does not work, reboot the smartphone device.
Honeywell
Android devices from this vendor having built-in barcode or RFID scanners depend on a separate pre-installed app called DataWedge.
DataWedge is used to configure the scanner settings and needs to be configured properly to work with TrackAbout.
- Install the TrackAbout app before proceeding
- Launch Honeywell DataWedge
- Open Settings, then Click on Scan Settings.
- Click on Internal Scanner
- Click the "+" icon at the top left of the screen to add a new profile.
- In the Add Profile screen that comes up, click on "Select an Application". Select TrackAbout from the list.
- A new entry called "TrackAbout Profile" will be created. Click on that entry.
- Click on "Data Processing Settings"
- Uncheck the checkboxes for Launch Browser, Scan to Intent, and Launch EZ Config.
- Check the Data Intent checkbox
- Click on Data Intent
- Click on Action, and type in "com.trackabout.scanwedge" , and click Ok.
- Click on Category, and type in "TrackAboutScan", and click Ok.
- Exit from Settings.
Now open the TrackAbout app
- Log in
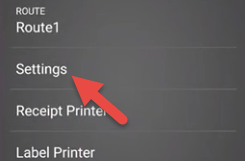
- Go to Settings from the left menu
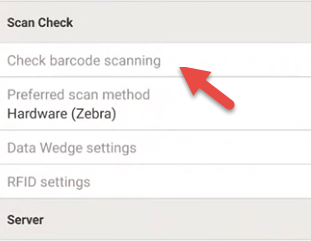
- Click on Data Wedge settings
- Click on Intent Data Key, and type in "data"
- The Intent Name and Intent Category should already be set to "com.trackabout.scanwedge", and "TrackAboutScan"
- Click on Done.
- Click "Check barcode scanning" under "Scan Check"
- When you see "Use this screen to test the scanning capability of your device," scan a barcode using the hardware scanner (don't select orange scan box to bring up camera). The barcode scanned will appear on the screen.
- Click back and a new option appears, "Preferred Scan Method".
- Ensure "Preferred Scan Method" is set to "Hardware (Internal)"
Urovo
Android devices from this vendor having built-in barcode or RFID scanners depend on a separate pre-installed app called DataWedge.
DataWedge is used to configure the scanner settings and needs to be configured properly to work with TrackAbout.
- Install the TrackAbout app before proceeding.
- Open the Scanner application and tap the Gear icon to open Scanner Settings.
- Under "Keyboard output mode", uncheck "output the barcode into the focused edit box".
- Make a note of the "Intent action" value. At the time of this writing, it is "android.intent.ACTION_DECODE_DATA".
- Make a note of the "Intent string extra" value. At the time of this writing, it is "barcode_string".
Now open the TrackAbout app.
- Log in
- Go to Settings from the left menu.
- Tap on Data Wedge settings.
- Tap on Intent Name and enter the "Intent action" value noted above.
- Tap on Intent Data Key and enter the "Intent string extra" value noted above.
- The Intent Category does not need to change.
- Tap on Done.
- Log into the TrackAbout app
- Go to Settings from the left menu
- Click on Data Wedge settings
- Tap "Check barcode scanning" under "Scan Check"
- When you see "Use this screen to test the scanning capability of your device," scan a barcode using the hardware scanner (don't select orange scan box to bring up camera). The barcode scanned will appear on the screen.
- Tap "Back" and a new option appears, "Preferred Scan Method".
- Ensure "Preferred Scan Method" is set to "Hardware (Internal)"
Urovo DataWedge Troubleshooting
Issue: DataWedge Demo app appears when scanning in some screens in TAM7
Solution: Remove TAM7 associations from the DataWedge Demo profile
- Tap the menu button in the demo app (three dots on the bottom right hand side of the screen)
- Choose Settings
- Tap on Associated Apps
- Tap and hold to delete any app that says TrackAbout
- Return to TAM7 and try scanning again
Chainway
Android devices from this vendor having built-in barcode scanners depend on a separate pre-installed app called KeyboardEmulator.
KeyboardEmulator is used to configure the scanner settings and needs to be configured properly to work with TrackAbout.
- Launch Chainway KeyboardEmulator
- Click on AppSettings
- Under "Process Mode", select BroadcastReceiver.
- Verify that the "Broadcase name" field is set to "com.scanner.broadcast" and the "Key" field is set to data. If not, set them to these values.
- Exit from KeyboardEmulator.
Now open the TrackAbout app
- Log in
- Go to Settings from the left menu
- Click on Data Wedge settings
- Click on Intent Name, and set the value to "com.scanner.broadcast"
- Click on Intent Data Key, and type in "data"
- The Intent Category should already be set to "TrackAboutScan"
- Click on Done.
- Click "Check barcode scanning" under "Scan Check"
- When you see "Use this screen to test the scanning capability of your device," scan a barcode using the hardware scanner (don't select orange scan box to bring up camera). The barcode scanned will appear on the screen.
- Click back and a new option appears, "Preferred Scan Method".
- Ensure "Preferred Scan Method" is set to "Hardware (Internal)"
ECOM
Android devices from this vendor use the ECOM Ident-EX 01 Bluetooth wands that can scan barcodes or read RFID tags.
- Power on Ident-EX 01 with RFID (NU_UNI900) or Barcode (ZN SE965) module by holding the power button for 3 seconds
- Pair the device in the Bluetooth settings on the phone. Note the name of the device.
- Launch the eSETUP Ident-EX app on the phone
- Tap the Bluetooth icon in the top right and choose the device with the name you noted in step 2. You may need to scan for devices.
- At this point, the device should have the following lights should be on: SPP (orange), Bluetooth (blue), Power (red), Batter (Orange)
- Switch to the "General" tab in the app
- Pick the correct head module (NU_UNI900 or ZN SE965)
- Set Preamble and Postamble to the values given to you by TrackAbout support
- Ensure HID Autoconnect is enabled
- Go to the Connection tab and tap "Save and Send"
- You should see a progress bar update to 100% and get a message that the "File Successfully Transferred"
- Tap the Bluetooth icon to disconnect
- Ensure the device is connected via Bluetooth to the phone.
- Continue setup by following the directions in the "Bluetooth Barcode and RFID Scanner Support" section below
Bluetooth Barcode and RFID Scanner Support
Scanning assets with TrackAbout Mobile 7 using your phone's built-in camera is fast and reliable, but there are times when having another scanning method might fit your workflow better. That's why TrackAbout Mobile 7 (Android only) supports Bluetooth barcode and RFID scanners.

Bluetooth barcode and RFID scanners are widely available from numerous manufacturers, with models ranging from inexpensive on up, depending on features. Any basic scanner that supports HID communication and can pair with an Android phone should work with TrackAbout Mobile 7 (Android only). However, due to the vast array of scanners out there, we can't guarantee that any particular make/model is 100% compatible with TrackAbout or will meet your business needs.
Using a Bluetooth HID Scanner with TrackAbout Mobile 7 (Android)
Before you can start using Bluetooth HID scanners with TrackAbout Mobile 7 (Android), you'll need:
-
Both a scan prefix code and a scan suffix code
The codes let TrackAbout Mobile 7 (Android) accurately read the data from a Bluetooth HID scanner.
TrackAbout Support can help you create the codes (just give them a shout) and then will setup the codes in your TrackAbout system. You'll then program the codes into the individual scanners when you pair them with a mobile device running TrackAbout Mobile 7 (Android).
In most cases, you'll only need one prefix code and one suffix code. Each Bluetooth HID scanner you put into service can use the same two codes.
-
A Bluetooth scanner that supports HID Communication
HID (or Human Interface Device) is a technical standard that lets devices talk to each other. When looking for a device, look for Bluetooth HID, HID Compliant, or just HID in the device's specifications.
-
An Android phone or tablet
The iPhone/iOS version of TrackAbout Mobile 7 does not support Bluetooth HID devices at this time.
-
TrackAbout Mobile 7.335 (or later) for Android
When all that's in place, you're ready to set up TrackAbout Mobile 7 (Android) to use a Bluetooth HID scanner:
Pair the scanner with your Android device following the instructions provided with the scanner and install any configuration apps that came with the scanner as recommended by the manufacturer.
If you get a notification to Configure physical keyboard when you pair the scanner, tap the notification and make sure Use on-screen keyboard is on.


After pairing, program the scanner to use the scanning prefix code and suffix code.
Depending on the make and model of scanner, you'll do this through the mobile device using a manufacturer-provided app or by manually scanning in the codes. In either case, follow the manufacturer's instructions to program the prefix and suffix codes. For assistance with programming your device contact TrackAbout Support.
Once the scanner is paired and configured to use the correct prefix and suffix codes, you'll need to tell TrackAbout Mobile 7 that you're using an HID device for scanning.
If you're setting up a barcode scanner, TrackAbout Mobile 7 should recognize the device by default.

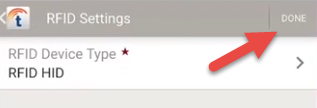
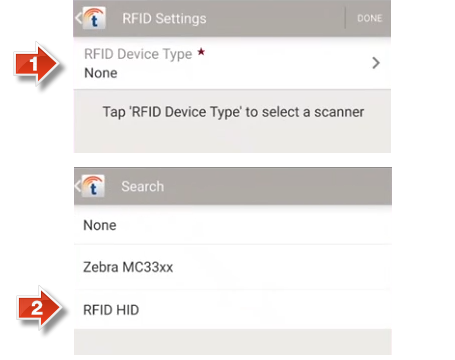
If you're setting up an RFID scanner, you'll need to set TrackAbout Mobile 7's RFID Device Type to RFID HID:
-
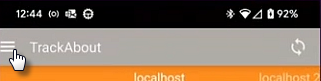
In TrackAbout Mobile 7, open the MENU.
-
Tap Settings.
-
Tap RFID settings in the Scan Check section.
-
Select RFID HID as the RFID device type.
-
Tap DONE.