Please visit our new TrackAbout Knowledge Base at https://supportkb.trackabout.com for the most-up-to-date documentation on TrackAbout and TrackAbout Mobile.
Bundles and Packs
Introduction
Sometimes assets are bundled together and moved in a group (example: 12-pack of cylinders, 6-pack of cylinders). Some clients call these "Bundles", “Clusters”, or "Packs".
NOTE Bundles and Packs are different terms for the SAME physical entity. Within TrackAbout:
- A Bundle is a group of assets manifolded together in which ONLY the frame and product information are gathered, but there is no information pertaining to the individual assets.
- A Pack is a group of uniquely registered assets that have been manifolded together. In this case, the system has information on BOTH the frame and the assets inside.
Rather than scanning each individual asset whenever this group moves, the 'Make Pack' feature can be used to group these assets together. When this "pack" of assets moves, only the pack barcode needs to be scanned. The Pack has its own Product Code, separate from the Product Code of the assets in the Pack. Once these assets have been associated with a pack barcode, they act as one asset until they are broken, or 'removed' from the pack. All records pertaining to a pack will show with a count of one, including all production and distribution records. Upon return from customer, the pack is usually disbanded so that individual cylinders can be serviced for maintenance before refilling. When a pack is disbanded, the unique tracking ID assigned to the pack at the time of joining becomes meaningless, as it should never be used again.

Using the Make Pack Feature
Before using this feature:
- You must have Pack product codes set up in the database. These are different product codes than the product codes of the assets in the pack. For example, 244OX-P6 could be the Product code of 6 packs, but 244OX could be the product code of assets which will be placed into those packs. Make sure these are all set up.
- The individual assets which are going into the Pack should already have their Add New action done BEFORE adding them to a Pack.
Bundle Registration
This action is used for Bundle Registration in which frame information is gathered along with the number of cylinders in the bundle/pack. However, there is no unique tracking information entered for the cylinders in the bundle. The use case for this is when clients have already created bundles in their inventory they want to register and track. The client may not be able to access all of the individual asset information and so just registers the bundle as a whole. Later, when the client sends the bundle to maintenance and breaks up the bundle, the individual cylinders can be registered and the Make Pack action can be used to put the bundle/pack back together.
TA Mobile 7
Make Pack
With Make Pack, you put individually tracked assets into a group — a pack (aka bundle) — and while they’re grouped, they’re no longer tracked as individual assets, but treated and tracked as a single “pack” asset with its own product code, barcode and serial number.
1. Swipe to the Internal menu.
2. Tap Pack.

1. Scan the barcode assigned to the pack or, if the pack doesn’t have a barcode yet, key in its serial number.
- If the pack has an assigned Barcode, tap the scan icon, then scan.
- If the pack does not have an assigned barcode, tap to key-in its Serial Number instead.
2. Tap NEXT.

Specify who manufactured the pack frame and when.
1. Tap Select... to display a list of manufacturers to select from.
2. Tap Manufacture Date to select the month and year the pack frame was manufactured.
3. Tap NEXT.

1. Search for or scan in the Product Code of the pack you’re building.
- To grab the product code from a barcode, tap the scan icon and scan the barcode.
- To manually search for a product code, key in the full or partial product code you’re looking for. Matches display as you type — just tap the code you’re looking for when you see it.
2. Tap NEXT.

1. Select, search, or scan for the pack frame’s owner.
- To grab the owner’s name from a barcode, tap the scan icon, and scan the barcode.
- To manually select the pack frame’s owner, key in the full or partial name you are looking for. Matches display as you type — just tap the name you’re looking for when you see it.
2. Tap NEXT.

1. Fill-in any missing data before scanning assets into the pack.
- If you entered the pack’s serial number earlier instead of Barcode, scan in the pack’s Barcode now.
- If you entered the pack’s barcode earlier instead of serial number, scan or key in the pack’s Serial Number now.
2. Specify the total number of assets you’re adding to the pack (required). Tap Select... under Pack Quantity, then select a quantity from the list.
3. Tap NEXT.

Scan or key-in the barcodes of the assets that will make up the pack. Note: The assets you are adding to the pack must have their own barcodes and all have the same product code. When the number of scanned barcodes equals the number of barcodes (assets) must contain, you’re automatically taken to the next page.
- Tip: Tap DONE to open the page before you’ve scanned all the needed assets.
- Tip: Tap DONE to open the page before you’ve scanned all the needed assets.

1. Review the assets you’ve added to the pack.
2. Tap SAVE to create the pack. Note: The number of barcodes scanned must match the pack’s selected Pack Quantity to save.

To remove one or more assets from the pack:
- 1. Tap the assets to select them (selected assets are indicated by a highlight).

- 2. Tap the TRASH CAN.

- 3. Tap REMOVE to confirm the removal (tap DON’T REMOVE to cancel).

To add an asset to the pack:
- 1. Tap SCAN to open the scan interface to scan additional barcodes.

- 2. Tap the KEYBOARD to key-in additional barcodes.

Unmake Pack
Unmake Pack lets you separate (or unbundle) a pack back into individual assets. Once separated, the individual assets are tracked as individual assets again, and the pack itself is no longer tracked.
1. Swipe to the Internal menu.
2. Tap Unmake Pack.

1. Tap the SCAN icon to begin scanning the container(s) you want to unpack.

Scan the barcode or serial number of the pack(s) you’re unpacking. When you’ve scanned all the packs you’ll be unpacking, tap DONE (1). Note: This option is only available if you’ve scanned at least one pack.
- Tip: The counter shows you how many packs you’ve scanned so far.
- Tip: The counter shows you how many packs you’ve scanned so far.

1. Tap SAVE to unpack the listed packs.

To remove a pack from the list before saving (and unpacking it):
- 1. Tap the pack to select it.

- 2. Tap the Trash Can.

- 3. Tap REMOVE to confirm the removal (tap DON’T REMOVE to cancel).

To add a pack to the list for unpacking:
- 1. Tap SCAN.

TA Mobile 6
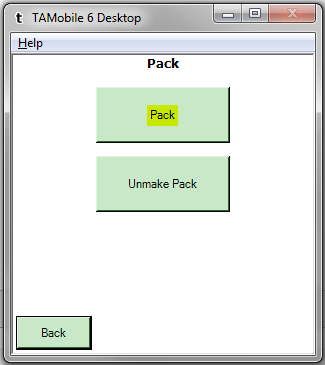
Make Pack
- Make sure that each individual asset that will make the pack is already in TrackAbout (Initialized).
- On the handheld, use the arrow at the bottom to navigate to the screen with the Pack Button.
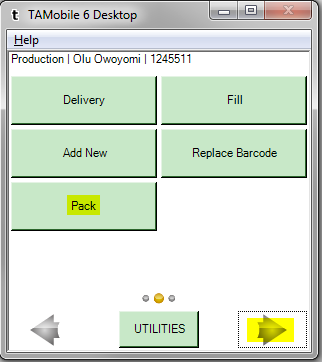
- Click on the Pack button.
- Scan the Barcode of the pack itself.
- Enter The Pack Serial Number (S/N).
- From the drop-down list, select the quantity of assets which will be placed in this pack. Your choices are: 06, 10, 12. We can add to this list at any time.
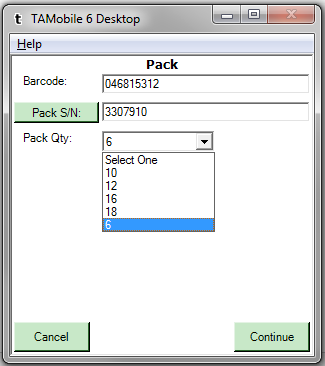
- Click the Continue button.
- From the drop-down lists, select the classification of the pack itself OR tap on the Item# button and enter the Product Code of the pack itself (for example, Argon100-P6). The classification will automatically populate.
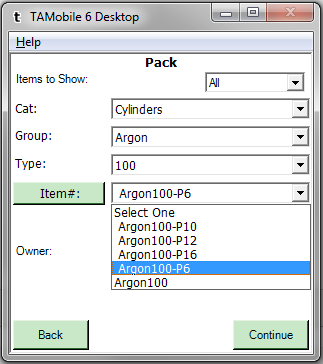
- From the drop-down list, choose the Owner of the pack itself.
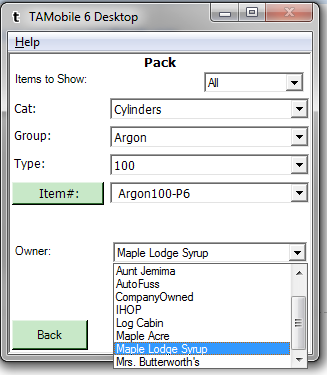
- Click the Continue button.
- Scan (you can also key in the barcodes) the individual assets to be placed into the pack. TrackAbout will only allow you to enter the number of assets into the pack based on your selection, in the previous screen, of how many assets are in the pack. These assets should already have their Add New done prior to putting them into the pack.
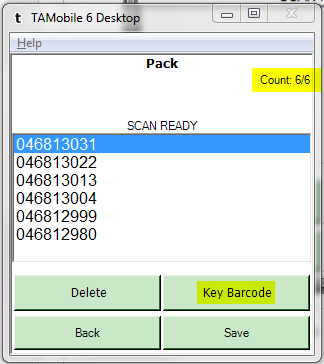
- Click the Save button and sync.


TA Mobile 5
Make Pack
- Make sure that each individual asset that will make the pack is already in TrackAbout (Serialized).
- On the handheld, go to the Internal tab.
- Click on the MAKE PACK button.
- Scan the Barcode of the pack itself.
- The Pack # is generally the serial number of the pack itself.
- From the drop-down list, select the quantity of assets which will be placed in this pack. Your choices are: 06, 10, 12. We can add to this list at any time.
- Click the Continue button.
- From the drop-down lists, select the classification of the pack itself OR tap on the Item# button and enter the Product Code of the pack itself (for example, 244OX-P6) and the classification will automatically populate.
- From the drop-down list, choose the Owner of the pack itself.
- Click the Continue button.
- Scan the individual assets to be placed into the pack. TrackAbout will only allow you to enter the number of assets into the pack based on your selection, in the previous screen, of how many assets are in the pack. These assets should already have their Add New done prior to putting them into the pack.
- Click the Save button and sync.
After you have synced, you can find the pack itself in the website by searching for the barcode of the pack. However, this will not show you the assets which are in the pack. The assets which are in the pack go into an "Unknown" location, since the pack moves by scanning only the pack's barcode.
Finding the Individual Pack Assets via the Website
- From the TrackAbout website, go to the Asset Search page.
- Click on the plus sign (+) next to "More Asset Search Options." This will expand the search options.
- Enter the Pack # or the serial number of the pack itself into the "Pack#" field. Note: If you do not see this field after expanding the search options, then log out and log back in the website.
- Click on the Search button. The individual assets in the pack will be returned. Note that these assets all have a Pack#.
Unmake a Pack
- On the handheld, go to the Internal tab.
- Click on the MAINT button.
- Click on the Unmake Pack button.
- Scan the barcode of the pack itself. This removes the Pack# from the individual assets in the pack.