Generating Rental Bills
| TrackAbout Feature | |
|---|---|
| Feature Name: | Generating Rental Bills |
| In Module: | Rental |
| Short Description | Allow TrackAbout to calculate and generate your customer Rental Invoices. |
| Available In: | |
| ← Back to list | |
Create Rental Billing Period
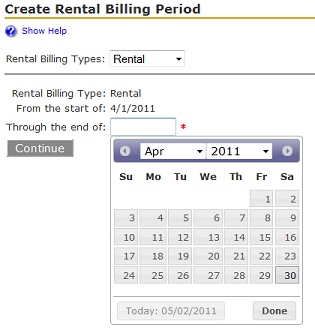
Customers are charged rent within a Rental Billing Period. The first step to creating a Rental Billing Period is to select a Rental Billing Type. TrackAbout should have already been contacted to set up Rental Billing Types to allow for different Rental Classes to be billed on different cycles. For example, customers may be billed once a month for cylinder rental, but more frequently for equipment rental. However, even if different Rental Classes are billed on the same cycle, assigning them to different Rental Billing Period Types allows their rental bills to be run separately. After a Rental Billing Type has been selected, the date range for the Rental Billing Period is chosen. The first time a Rental Billing Period is created within TrackAbout, the Start Date and End Date for that Rental Billing Period may be any dates. However, for any Rental Billing Period created after the first one, the Start Date must be the very next day after the previous Rental Billing Period ends. TrackAbout allows for neither overlapping of Rental Billing Periods nor breaks in time between Rental Billing Periods.
- NOTE: Once a Rental Billing Period has been created, it cannot be deleted through the website. Contact TrackAbout Support before bills are generated, if deletion is necessary.
Check Rental Billing Period Prerequisites
Once the Rental Billing Period has been created, the Check Rental Billing Period Prerequisites page will open. This page lists and describes the prerequisites which must be passed before rental bills can be generated. For example, TrackAbout checks to make sure that all assets are classified and that all invoice records delivered before the end of the Rental Billing Period are verified. For any prerequisites which have failed, there is a link to a page where these problems can be corrected. The prerequisites can then be re-checked. Continue opens the Rental Billing Period Dashboard.
The Rental Billing Period Dashboard
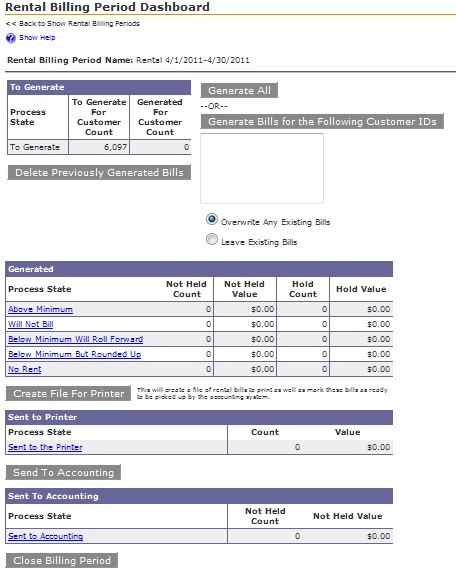
The Rental Billing Period Dashboard is where rental bills are generated, reviewed, and sent to the printer and to accounting. It is very important to work through this page from top to bottom. After rental bills have been sent to the printer and to accounting, it is too late to go back and regenerate them, or to review them. While it is possible to contact TrackAbout to unlock these bills after they’ve been sent, it is much easier to carefully review the rental bills before sending them.
Generating Rental Bills
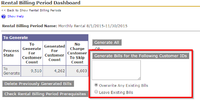
The top section of the Rental Billing Period Dashboard is where rental bills are generated. The Rental Billing Period Name gives the Rental Billing Period Type (for example, Cylinder Rental) and the date range for the Rental Billing Period.
The To Generate table shows a count of all customers in TrackAbout. TrackAbout will attempt to generate a rental bill for every customer. Many customers will not need a rental bill, but the system will try to generate one for every customer.
There are two options provided for generating rental bills at this point:
- Generate All rental bills for the Rental Billing Period.
- Generate Bills for the Following Customer IDs - This allows rental bill generation for select customers only. If rental bills are to be generated only for certain customers, enter those customers’ IDs in the field provided before hitting Generate For Below Customer IDs.
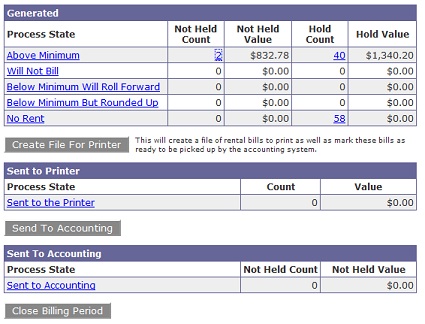
After bills are generated, a summary of the rental bills will appear in the Generated section of the Rental Billing Period Dashboard. These will be categorized based on circumstances surrounding each bill.
- Above Minimum - These are rental bills whose dollar value is greater than the minimum that has been set for billing. See section on Minimum_Billable_Amount for more information about this setting.
- Will Not Bill - These have totals less than the minimum billed amount and will not bill.
- Below Minimum Will Roll Forward- These have totals less than the minimum billed amount and will roll the total into the next billing period.
- Below Minimum But Rounded Up- These have totals less than the minimum billed amount but have been rounded up to meet the minimum billable amount.
- No Rent - These are customers for which there are no rental charges. Generating a "bill" for every customer for every billing period ensures that no customers who should receive a bill are missed.
As bills are generated, some will fall into a Hold state. Rental bills can be Held for a variety of reasons. For example, they may be held because they’re missing information, such as the mailing address. Or, the customer may have their bills held for some special handling or reviewing. See more information on Bill Holds.
Review Rental Bills
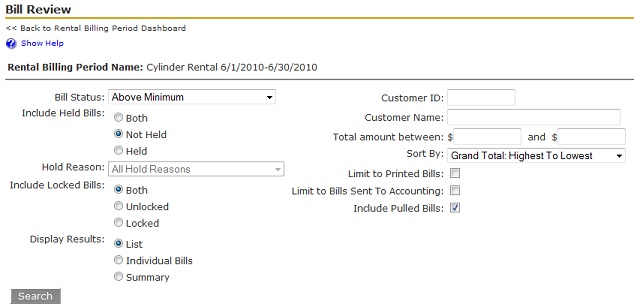
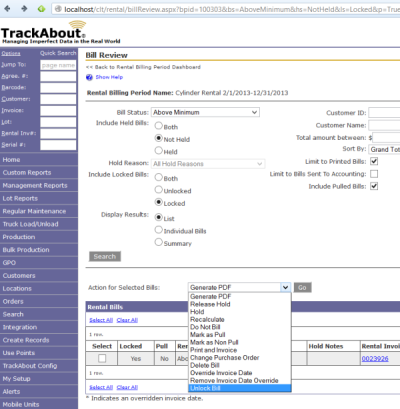
Clicking on any of the blue links will open the Bill Review page which gives detailed information pertaining to the selected group of bills. For example, clicking on the blue 2 in the screen above will open the Bill Review page showing detailed information about all of the Not Held rental bills which are above the minimum.
The top of the Bill Review page allows you to search for bills meeting various criteria. It also allows you to choose from 3 different display results:
- List - Displays a list of the rental bills.
- Individual Bills - Shows the detailed bills one at a time on the page.
- Summary - Displays a brief summary of the rental bills.
Actions available on Bills
The columns in this table are described below. This list also help you understand the possible actions available for selected bills:
- Select - Clicking on a box in this column will put a check mark in the box and select that row. Once the desired rows have been selected, an Action for Selected Bills can be chosen from the drop-down list, and the Go button hit to initiate that action.
- Locked - After rental bills have been sent to the Printer and/or Accounting, they are marked as Locked and cannot be changed.
- Pull (pull from print queue) - This is a flag on the Rental Bill to tell the third-party printer not to print this bill. For example, there may be a Customer for whom it is preferable to fax or email the rental bill.
- Rental Bill State - Displays whether or not the bill is above the set minimum.
- Recalculate selected bills when unlocked
- Hold Status - Displays either Not Held or, if the bill is held, displays the reason for the hold.
- Hold Notes - Displays any reasons which may have been entered on the Customer for holding rental bills (Missing address, missing tax info, etc..)
- Rental Invoice - Shows the Rental Invoice number in the form of a link. Clicking on this link will open the actual invoice.
- Customer - Clicking on the customer link in this column will open a separate Customer Detail View window.
- Rent - Shows the dollar amount of rental on each invoice.
- Flat Fees - Displays the dollar amount of flat fees on each invoice.
- Tax - Gives the amount of tax being charged on each invoice.
- Total - Sums the Rent, Flat Fees, and Tax.
From the List of bills in the Bill Review page, a Rental Invoice link can be clicked on to see details about a particular invoice. After bills have been reviewed in the Bill Review page, the final section of the Rental Billing Period Dashboard offers the opportunity to proceed.
Selecting Create File For Printer creates a file with rental invoice details that can be used for printing. Once invoices have been sent for printing, those rental invoices are marked as Locked in TrackAbout. The Sent to the Printer link opens a page where those invoices can be seen.
Choosing Send to Accounting sends the rental information to your accounting/business system. Invoices sent to accounting are marked as Locked in TrackAbout. The Sent to Accounting link opens a page where those invoices can be seen. After the rental invoices for the selected Rental Billing Period have been reviewed and sent to the Printer and/or Accounting, click on Close Billing Period. The billing period must be closed before any subsequent billing periods can be created.
Locked Rental Bills
Once a bill has been 'Sent to the Printer' it is considered locked - no further modifications are allowed on the bill and the bill cannot be re-generated.
A user can unlock a rental bill if he/she belongs to a role that has the 'Unlock Bills' permission, or is a System Admin.
Note: Once a bill has been Sent to Accounting, it cannot be unlocked by any user. TrackAbout support can unlock these bills after a written request is sent by TrackAbout administrators.
Special Bill Generation: Equipment Rental
Specific to Equipment Rental, often bills need to be generated more often than on a monthly basis. As equipment is returned during the billing period, here are the steps to create rental bill invoices for specific customers:
- If not yet created, create an Equipment rental billing period.
- Access the opened Equipment rental billing period,
- Enter the specific customer ID, or ID’s, in the text box under the Generate Bills for the Following ID’s:
- Click the button Generate Bills for the Following ID’s.
- Access the bill, save or print as needed.
- Repeat above as needed during the billing period.
At the end of the month, generate all the rental bills by following the steps below:
- Access the open Equipment rental billing period.
- Select “Leave Existing Bills” option.
- Click Generate All and let run until completion. This will only create the bills for the equipment that is still at customer and that was not yet invoiced.
