Internal Inventory Audit
| TrackAbout Feature | |
|---|---|
| Feature Name: | Internal Inventory Audit |
| In Module: | Core Tracking |
| Short Description | The Physical Inventory process allows for internal asset auditing and “cycle counts”. |
| Available In: | TAMobile 6 Desktop, TAMobile 6 Rugged |
| ← Back to list | |
Internal inventory audits are a common business practice of taking inventory of all of the assets in an internal location to make the system more accurate and to find lost assets. The audits are generally conducted on a regular basis, from monthly to yearly, and as needed.
TrackAbout gives you two ways to conduct an internal audit.
-
Physical Inventory, which includes an audit reconciliation process.
-
Locate, which does not include reconciliation assistance.
Both ways let one or more person teams using TrackAbout Mobile 7 or TrackAbout Mobile 6 conduct internal audits.
Physical Inventory Audits
Creating an Audit
Inventory Audits are created automatically when Physical Inventory actions are saved from mobile devices.
We group Inventory records together by Location, Inventory Type (if a "Cycle" Inventory Type), and Use State.
If a record is saved and it does not match an existing Open Audit, a new Open Audit is created when the Physical Inventory record is saved. If the Physical Inventory record does match an existing Open Audit, the record is added to that Open Audit.
Conducting Physical Inventory Audits with TrackAbout Mobile 7
Using Physical Inventory on TrackAbout Mobile 7:
Start Physical Inventory
Launch Physical Inventory.
Tap the Physical Inventory button to begin.
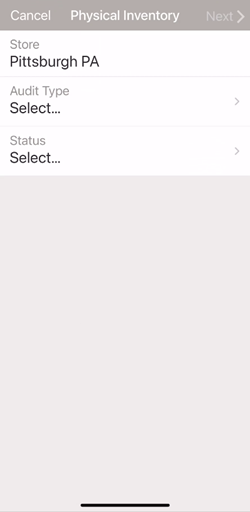
Physical Inventory Setup
Setup the audit details before you begin.
Store — The location being audited. Automatically set to your working location.
Audit Type — The type of audit you're doing.
Status — The fill status of the assets you're auditing.
Next — Begin scanning.
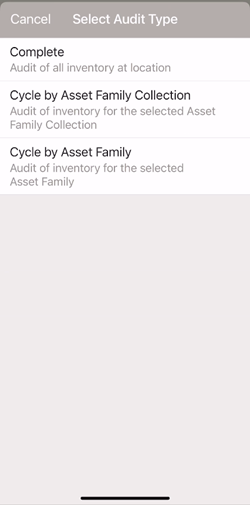
Select Audit Type
Select the type of audit you're doing at the location.
Tap an option to select it:
Complete — You are auditing all the inventory.
Cycle by Asset Family Collection — You are auditing only the inventory in a single Asset Family Collection.
Cycle by Asset Family — You are auditing only the inventory in a single Asset Family.
Once you've made your selection you'll automatically return to the Setup screen.
Select Status
Select the fill status of the assets you're inventorying.
Tap an option to select it:
Empty — You're inventorying empty assets.
Full — You're inventorying full assets.
Once you've made your selection you'll automatically return to the Setup screen.
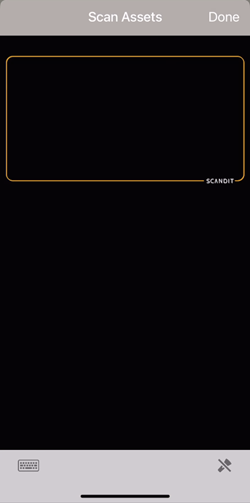
Scan Assets
Scan assets. If an asset is included in the type and status, it is registered. Continue scanning assets as needed.
Done — Finish scanning assets for now (you can come back to it later) and go to Running Totals.
![]() — Manually key in an asset tag.
— Manually key in an asset tag.
![]() — Turn your device's flash on or off.
— Turn your device's flash on or off.
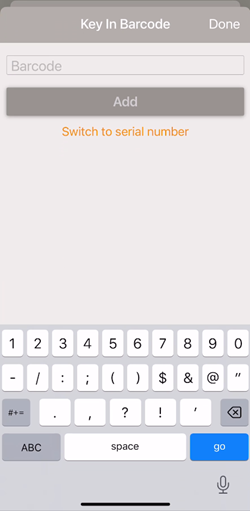
Key in Barcode
Type in asset tag or serial numbers instead of scanning them.
Done — Finish manually entering tags and/or serial numbers and return to the Scan Assets.
Barcode / Serial Number — Enter either a tag number or a serial number, as instructed.
Add — Mark the asset as found.
Switch to Serial Number — Enter serial numbers instead of tags.
Switch to Barcode — Enter tag numbers instead of tags.
Running Totals
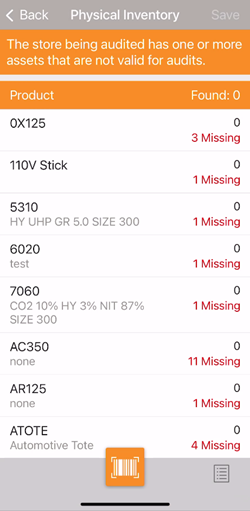
The results of the audit so far, by Product Code.
Product — Lists each Product Code being inventoried.
Found — Total number of assets inventoried so far.
Missing — The number of assets that haven't been inventoried yet, by Product Code.
Tap a Product Code to get details on the specific assets that have (and haven't yet) been inventoried.
![]() — Open the scanner to continue scanning assets.
— Open the scanner to continue scanning assets.
![]() — Open the menu for additional options:
— Open the menu for additional options:
Retrieve latest audit data — If there is more than one person conducting the audit, this synchs your progress with theirs.
Save — Save your progress, and report it back to TrackAbout, and close Physical Inventory.
Review Assets
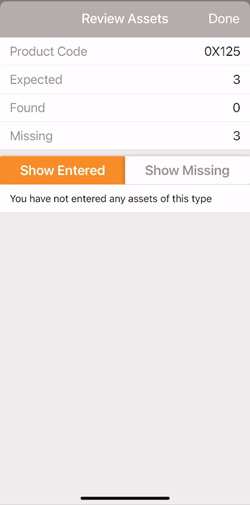
Shows you the inventory status of each asset of a specific Product Code.
Expected — The number of assets there should be.
Found — The number of assets there are, so far.
Missing — The number of assets that are unaccounted for.
Tap Show Entered for a list of the assets that have been inventoried so far.
Tap Show Missing for a list of the assets that have not been inventoried yet.
Conducting Physical Inventory Audits Using TrackAbout Mobile 6
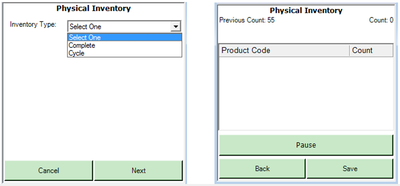
The user will be asked to select the location, kind of audit ('Complete or Cycle), and the Asset Family Collection for which the audit is being conducted. It will also ask you whether you will be scanning Full or Empty assets.
Then users will simply scan all assets they encounter of the kind they are targeting.
When the assets are scanned, three counts will be displayed on the screen.
-
Previous Count: This count includes the total number of assets of the targeted type that were previously scanned and saved to the website.
-
Count: This shows the number of assets scanned since the Physical Inventory action was started.
-
Count by Product Code: This shows the number of assets scanned since the Physical Inventory action was started, broken down by product code.
Audit Summary
Audits are 'open' until a user completes reconciliation.
Open Audit Summary The Open Inventory Audit Summary screen lists the basic details (Location, Date, Inventory Type, and Asset Family Collection), the Physical Inventory records created by TrackAbout Mobile, and a summarized list of assets grouped by product code. The grouped lists shows the quantity expected to be found, actually found, and the following values:
-
Difference: The number of expected assets minus those found. The found assets may not be the same as the expected assets.
-
Absolute Difference: The number of missing assets plus the surprise finds.
-
Missing Assets: Unique assets that were thought to be at the location but were not counted during the audit.
-
Surprise Finds: Unique assets that were thought to be an a different location or customer but were scanned at the audit location.
Surprise Empty Assets
Surprise finds and missing assets are the primary irregularities found during audits, but there is a third type of problem: 'Surprise Empties.' These are assets thought to be full but scanned as part of an empty audit record. Upon reconciliation, we locate these assets as empty, changing their use states. For clients that use empty product codes, this will change the product code to the appropriate empty one. Therefore, the asset is tallied using its empty product code, on a different line item.
Expected assets and surprise finds can both be surprise empties.
Counted Assets
The counted assets page shows all the assets scanned during an audit, divided into two groups:
-
Surprise Finds: Unique assets that were thought to be an a different location or customer but were scanned at the audit location. When this tab is active, the grid displays an extra column, 'Last Known Location'.
-
Expected Assets: Unique assets confirmed to be at the audit location.
This page highlights 'surprise empties' (by marking them with an asterisk and emphasizing the 'Scanned Status' text).
Missing Assets
This page displays unique assets thought to be at the audit location that were not counted during the audit.
Reconciliation
When reconciliation starts, a snapshot of the state of the audit is saved. If any information is added, changed, or deleted (new Physical Inventory records, reclassified assets, etc), the user is prompted the start the reconciliation over.
Reconciliation consists of three parts:
-
Surprise Finds - Lists assets that were scanned as part of the audit but are not located at the location the audit is for. These will be located at the location when the audit is completed.
-
Lost Assets - Assets that were thought to be at the location but where not scanned as part of the audit.
-
Reconciliation Completion - When an audit is completed, the system creates new records that mark the selected missing assets as lost, and locates assets as full or empty, depending on how they were classified during the Physical Inventory action.
A special case exists for assets thought to be full but scanned as empty. Those are located empty during the completion of the reconciliation.
Reconciled Audit Summary
When an audit is reconciled, three things happen:
-
It is locked. Its data is frozen; no further records will change it, neither additional inventory records at that location nor other location-setting records that might affect the contents of the audit.
-
We save information about the assets marked as lost or located as a result of the audit and initiate the creation of Mark Lost and Locate records, offline on our service bus.
-
TrackAbout takes the user to the Reconciled Audit page, which shows the same basic details and summary as the open audit summary page. As long as TrackAbout is processing new records created by the audit, it displays a message indicating how far along it is. For example: "TrackAbout is finalizing the audit, marking lost assets and locating unexpected assets. 2068 of 2430 assets have been resolved so far. Reload this page to see progress updates and view new records created for the audit". It also displays a list of records created by the audit that indicates which assets where Marked Lost, Located Full, or Located Empty. Here is an example of what this page looks like:
Locate Audits
Prepping the System
Determine which location(s) you want to focus on for audits.
Determine which product lines you'll be auditing.
Conducting the Audit
Use the "Locate" Action (which might be named something different in you system) on your TrackAbout Mobile devices to scan all assets you can find on site.
It is OK if you scan the same asset multiple times, the goal is just to get them all scanned.
It is OK if this scanning take more than a day to complete.
It is definitely OK to use more than one device.
It's very important to conduct your audit during a time that assets will not be moving around -- after hours, for instance.
Mark everything not scanned the assets at that location as LOST.
You have two options for this:
1. Use the Current Inventory page to find assets you want to mark as Lost.
Make sure to set the Filters with...
Location - Set only for the location in which you did the audit
Product - If you chose to do a product specific cycle count, select the Products and/or Asset Family included in the audit.
Results = Detailed option so that you get the barcodes for that location.
Limit = Show assets NOT on a record in the last 1 Day
Use the Mark Assets Lost page and enter the barcodes to Mark Lost.
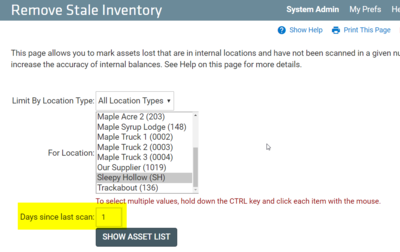
2. From the website, use the "Remove Stale Inventory" page to find and remove stale assets.
This page lets you find the assets that have not been scanned in X number of days. For a site audit, we recommend you set this to 1 Day.
Once you find the assets, you can mark them all as lost.
Once the Audit is complete, the Current Inventory report will reflect the updated list of what was scanned. The balance for this location should now be accurate. Everything not scanned will remain in a status of Lost until it is scanned.
Site Preparation
Save time and energy during the scanning and reconciliation phases of your Physical Inventory by spending some time on Site preparation. Here are some tips to help you prepare.
1. In the days leading up to the Audit/Inventory, make sure all tracked assets are tagged and barcoded.
2. Consider how the Inventory will be done and organize appropriately.
a. Complete - Identify where all the Full and Empty assets are located and make sure they're grouped together if possible. This way your operators have to do less hunting for Full or Empty assets.
b. Cycle Counts - For example, where are your specialty gas cylinders? Where are your wheelchairs? Do some scouting before hand to identify locations of target asset populations. Group these together, if possible, to make it easier for your operators to conduct scanning.

