Difference between revisions of "Gas Analysis"
(Marked this version for translation) |
(Added TA7 Gas Analysis - Docs) |
||
| (2 intermediate revisions by 2 users not shown) | |||
| Line 1: | Line 1: | ||
<translate> | <translate> | ||
{{TrackAbout Module | {{TrackAbout Module | ||
| − | |Module Description=TrackAbout’s Gas Analysis module helps eliminate paperwork by validating, recording, and attaching analysis information to a production record. | + | |Module Description=TrackAbout’s Gas Analysis module helps eliminate paperwork by validating, recording, and attaching analysis information to a production record. TrackAbout has a simple user interface to add analysis rules and associate them with the products that need to have these tests performed. |
| − | |Supported In=TAMobile 5, TAMobile 6 Rugged, TAMobile 6 Desktop | + | |Supported In=TAMobile 5, TAMobile 6 Rugged, TAMobile 6 Desktop, TAMobile Android, TAMobile iOS |
|Business Process=Production | |Business Process=Production | ||
| − | |Module_Description=The TrackAbout Gas Analysis module allows users to enter gas analysis information into a handheld mobile device. | + | |Module_Description=The TrackAbout Gas Analysis module allows users to enter gas analysis information into a handheld mobile device. The software can be configured to manage a variety of analytes (such as concentration, moisture content, or presence of an odor) and the rules that pertain to each. |
}} | }} | ||
== Overview == <!--T:1--> | == Overview == <!--T:1--> | ||
<!--T:2--> | <!--T:2--> | ||
| − | The TrackAbout Gas Analysis module allows users to enter gas analysis information into a handheld mobile device. | + | The TrackAbout Gas Analysis module allows users to enter gas analysis information into a handheld mobile device. The software can be configured to manage a variety of analytes (such as concentration, moisture content, or presence of an odor) and the rules that pertain to each. |
<!--T:3--> | <!--T:3--> | ||
| − | From the mobile device, the system will ask the user for the appropriate test results based on the gas being filled and alert the user if the recorded analyte passed validation by displaying either a “pass” or “fail” message. | + | From the mobile device, the system will ask the user for the appropriate test results based on the gas being filled and alert the user if the recorded analyte passed validation by displaying either a “pass” or “fail” message. Analysis results are saved and linked to the lot number and fill records of the utilized cylinders. |
== Set Up == <!--T:4--> | == Set Up == <!--T:4--> | ||
<!--T:5--> | <!--T:5--> | ||
| − | *The first step is to setup the analytes that you will be testing. | + | *The first step is to setup the analytes that you will be testing. These are set up through the TrackAbout Website. |
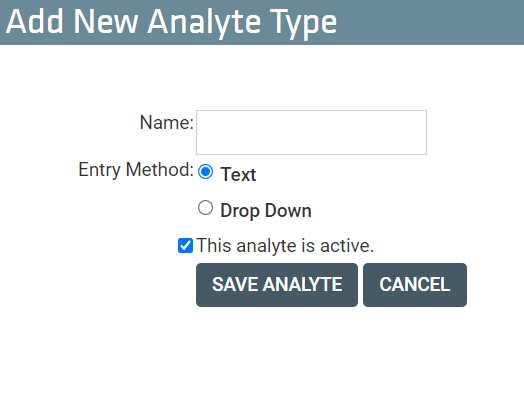
#Navigate to '''List Analyte Types''' under the '''TrackAbout Config''' menu option. NOTE: If you do not have this menu option, you will need to contact TrackAbout Support to enable this feature. | #Navigate to '''List Analyte Types''' under the '''TrackAbout Config''' menu option. NOTE: If you do not have this menu option, you will need to contact TrackAbout Support to enable this feature. | ||
#Click '''Create New Analyte Type''' | #Click '''Create New Analyte Type''' | ||
| Line 23: | Line 23: | ||
#Choose whether users should be allow to write in a value for this analyte (TEXT) or if the user should be given a list of drop down values (DROP DOWN). | #Choose whether users should be allow to write in a value for this analyte (TEXT) or if the user should be given a list of drop down values (DROP DOWN). | ||
#Leave the Analyte set to "This analyte is active". | #Leave the Analyte set to "This analyte is active". | ||
| − | #Click | + | #Click Save. |
<!--T:6--> | <!--T:6--> | ||
| Line 30: | Line 30: | ||
**Odor present | **Odor present | ||
**Moisture content | **Moisture content | ||
| − | :::[[ | + | :::[[File:AddNewAnalysisType.png|border]] |
<!--T:7--> | <!--T:7--> | ||
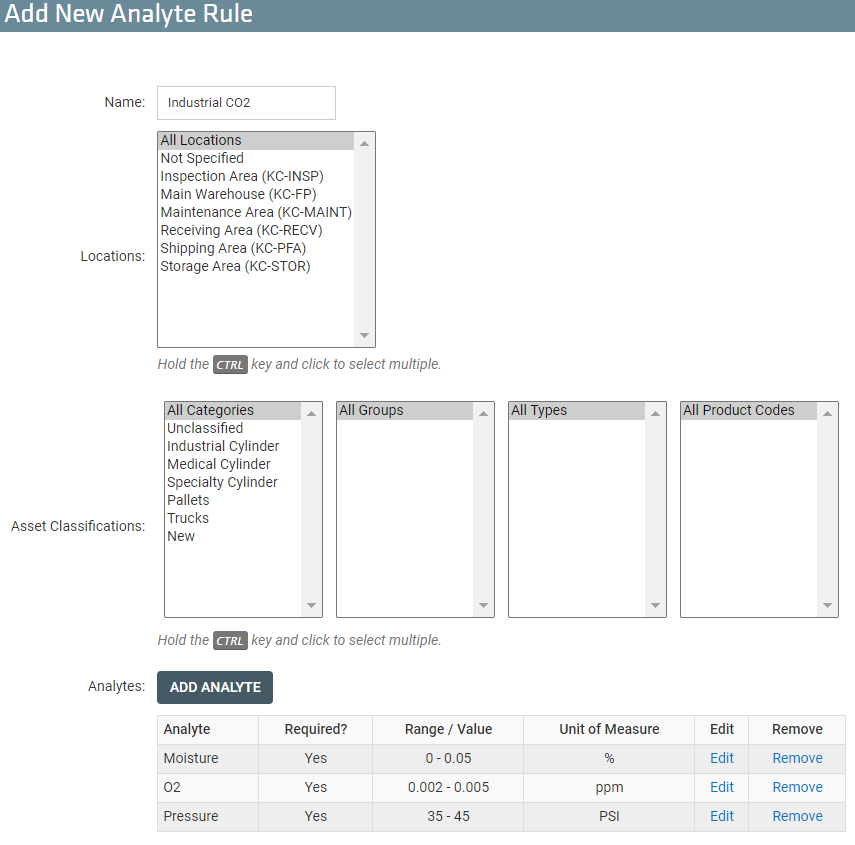
*The next step is to setup the gas analysis rules from the TrackAbout website: | *The next step is to setup the gas analysis rules from the TrackAbout website: | ||
| − | :::[[ | + | :::[[File:AddNewAnalyteRule.png|border]] |
<!--T:8--> | <!--T:8--> | ||
#Navigate to '''List Analyte Rules''' under the '''TrackAbout Config''' menu option. | #Navigate to '''List Analyte Rules''' under the '''TrackAbout Config''' menu option. | ||
| − | #Click '''Create New Analyte Rule''' | + | #Click '''Create New Analyte Rule'''. |
| − | #Name the Analyte Rule | + | #Name the Analyte Rule. |
#Select which locations will use this Analyte Rule. | #Select which locations will use this Analyte Rule. | ||
#Choose which Products will be subject to this kind of analysis. | #Choose which Products will be subject to this kind of analysis. | ||
| − | #Add the kinds of Analytes that will be tested for this analysis. The user will be asked to set the acceptable range for values collected during the analysis. | + | #Add the kinds of Analytes that will be tested for this analysis. The user will be asked to set the acceptable range for values collected during the analysis. Any value that falls outside this set range will be considered a "FAIL". |
| − | #Click | + | #Click Save. |
| − | == Analysis from the Handheld == <!--T:9--> | + | |
| + | |||
| + | ==Gas Analysis on TrackAbout Mobile 7 (for iOS and Windows)== | ||
| + | |||
| + | With Gas Analysis on the TrackAbout Mobile 7 app (for iOS and Windows) you can record the analysis results for a lot (or batch) of gas and know if it meets pre-defined specifications before it is put into stock — all from your mobile device. | ||
| + | <br />[[File:Spacer.png]]<br /> | ||
| + | {| | ||
| + | |- style="vertical-align:top;" | ||
| + | | | ||
| + | [[File:S1.png]] | ||
| + | [[File:Spacer.png]] | ||
| + | || | ||
| + | [[File:Spacer.png]] | ||
| + | || | ||
| + | On your mobile device, find and tap the ANALYZE button (button label may vary). | ||
| + | <br />[[File:Spacer.png]]<br /> | ||
| + | [[File:S1t.png]] | ||
| + | <br />[[File:Spacer.png]]<br /> | ||
| + | The scan interface automatically opens. | ||
| + | |- style="vertical-align:top;" | ||
| + | |||
| + | | | ||
| + | [[File:TAM7GA-s9-half.png]] | ||
| + | [[File:Spacer.png]] | ||
| + | || | ||
| + | [[File:Spacer.png]] | ||
| + | || | ||
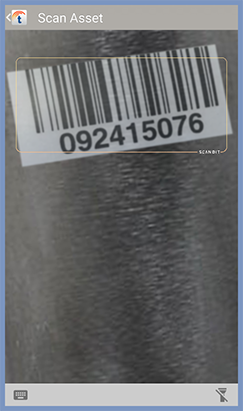
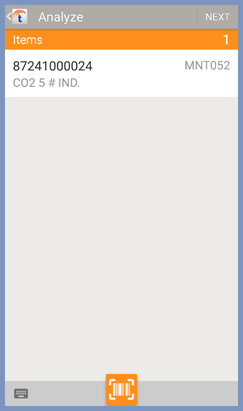
| + | Select a cylinder belonging to the lot (batch) being analyzed and SCAN or KEY-IN its barcode. | ||
| + | <br /> | ||
| + | <br /> | ||
| + | The scan interface automatically opens. | ||
| + | |- style="vertical-align:top;" | ||
| + | |||
| + | | | ||
| + | [[File:S3.png]] | ||
| + | [[File:Spacer.png]] | ||
| + | || | ||
| + | [[File:Spacer.png]] | ||
| + | || | ||
| + | Confirm the scanned barcode is the correct one and tap NEXT to go to the next screen. | ||
| + | <br />[[File:Spacer.png]]<br /> | ||
| + | [[File:15.png]] | ||
| + | <br />[[File:Spacer.png]]<br /> | ||
| + | If you’d like to use a different cylinder in the lot (batch) other than the one you scanned, tap to select the scanned asset, tap the TRASHCAN, and then SCAN or KEY-IN the barcode of the other asset. | ||
| + | <br />[[File:Spacer.png]]<br /> | ||
| + | |- style="vertical-align:top;" | ||
| + | | | ||
| + | [[File:S4.png]] | ||
| + | [[File:Spacer.png]] | ||
| + | || | ||
| + | [[File:Spacer.png]] | ||
| + | || | ||
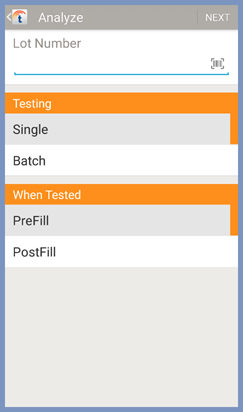
| + | ''LOT NUMBER'' — Scan or key-in the lot (batch) number of the asset being analyzed if it has not automatically pre-populated | ||
| + | <br />[[File:Spacer.png]]<br /> | ||
| + | [[File:11.png]] | ||
| + | <br />[[File:Spacer.png]]<br /> | ||
| + | ''TESTING'' — Specify the testing method used. Tap SINGLE if a single cylinder was tested to represent the lot/batch (default). Tap BATCH if a sample of lot/batch cylinders were tested as they were hooked up to the manifold. | ||
| + | <br />[[File:Spacer.png]]<br /> | ||
| + | [[File:12.png]] | ||
| + | <br />[[File:Spacer.png]]<br /> | ||
| + | ''WHEN TESTED'' — Tap PREFILL if the lot (batch) was tested prior to fill (default). Tap POSTFILL if the lot (batch) was tested after fill. | ||
| + | <br />[[File:Spacer.png]]<br /> | ||
| + | [[File:13.png]] | ||
| + | <br />[[File:Spacer.png]]<br /> | ||
| + | Tap NEXT to go to the next screen. | ||
| + | <br />[[File:Spacer.png]]<br /> | ||
| + | [[File:14.png]] | ||
| + | <br />[[File:Spacer.png]]<br /> | ||
| + | |- style="vertical-align:top;" | ||
| + | | | ||
| + | [[File:21.png]] | ||
| + | [[File:Spacer.png]] | ||
| + | || | ||
| + | [[File:Spacer.png]] | ||
| + | || | ||
| + | Under Analyte Types you’ll see what test result data needs to be entered and validated for this lot or batch. The exact Analyte Types you’ll be recording test results for will vary depending on the specifications of the gas being filled and your location. Common Analyte Types are for purity, odor, and moisture. | ||
| + | <br /><br /> | ||
| + | Tap an untested Analyte Type to select it. Tap EDIT ANALYSIS to enter the test results for that Analyte Type. | ||
| + | <br />[[File:Spacer.png]]<br /> | ||
| + | [[File:22.png]] | ||
| + | <br />[[File:Spacer.png]]<br /> | ||
| + | |- style="vertical-align:top;" | ||
| + | |||
| + | | | ||
| + | [[File:23.png]] | ||
| + | [[File:Spacer.png]] | ||
| + | || | ||
| + | [[File:Spacer.png]] | ||
| + | || | ||
| + | Each Analyte Type asks you to enter test results for a single test. | ||
| + | <br />[[File:Spacer.png]]<br /> | ||
| + | ::''Analysis Type'' — The analyte being tested. | ||
| + | <br /> | ||
| + | ::''VALUE'' — The results of that test. (Asterisk indicates a value is required.) You’ll be asked to key-in a value or select one from a list. | ||
| + | <br /> | ||
| + | ::[[File:24.png]] | ||
| + | <br /> | ||
| + | ::''UNIT OF MEASURE'' — If the Analyte Type requires, this prompts you to enter the unit of measure used in the test (for example %, PPM, PSI). Tap to select. | ||
| + | <br />[[File:Spacer.png]]<br /> | ||
| + | ::[[File:29.png]] | ||
| + | <br />[[File:Spacer.png]]<br /> | ||
| + | Tap VALIDATE to compare the entered test result against the gas’s defined specification. | ||
| + | <br />[[File:Spacer.png]]<br /> | ||
| + | [[File:25.png]] | ||
| + | <br />[[File:Spacer.png]]<br /> | ||
| + | The results of the comparison are displayed. | ||
| + | ::''Passed'' – The test result has been validated to be within specification. | ||
| + | <br />[[File:Spacer.png]]<br /> | ||
| + | ::[[File:302.png]] | ||
| + | <br />[[File:Spacer.png]]<br /> | ||
| + | ::''Failed'' — The test result is outside specification and cannot be validated. | ||
| + | <br />[[File:Spacer.png]]<br /> | ||
| + | ::[[File:31.png]] | ||
| + | <br />[[File:Spacer.png]]<br /> | ||
| + | Tap DONE to return to the Analyte Type screen. | ||
| + | <br />[[File:Spacer.png]]<br /> | ||
| + | [[File:32.png]] | ||
| + | <br />[[File:Spacer.png]]<br /> | ||
| + | |||
| + | |- style="vertical-align:top;" | ||
| + | |||
| + | | | ||
| + | [[File:Fail.png]] | ||
| + | [[File:Spacer.png]] | ||
| + | || | ||
| + | [[File:Spacer.png]] | ||
| + | || | ||
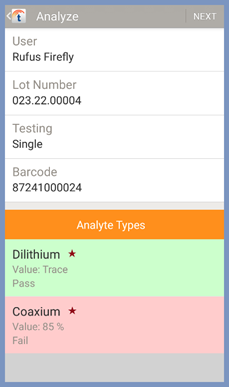
| + | After validation, an Analyte Type will show whether it passed (green) or failed (red) validation. | ||
| + | <br /><br /> | ||
| + | You can edit (and re-validate) any of the Analyte Types by selecting it and tapping EDIT ANALYSIS. | ||
| + | <br /><br /> | ||
| + | When you’ve entered and validated all required test result data, tap NEXT to save and link the analysis to the lot (batch) number and the fill records for the individual cylinders in the lot (batch). | ||
| + | <br /><br /> | ||
| + | [[File:33.png]] | ||
| + | <br />[[File:Spacer.png]]<br /> | ||
| + | |- style="vertical-align:top;" | ||
| + | |||
| + | | | ||
| + | [[File:34.png]] | ||
| + | [[File:Spacer.png]] | ||
| + | || | ||
| + | [[File:Spacer.png]] | ||
| + | || | ||
| + | Depending on your system configuration, you may be prompted to digitally sign the analysis report before it’s saved. | ||
| + | <br /><br /> | ||
| + | Tap SIGNER’S NAME and key-in your name. | ||
| + | <br />[[File:Spacer.png]]<br /> | ||
| + | [[File:35.png]] | ||
| + | <br />[[File:Spacer.png]]<br /> | ||
| + | Tap ENTER SIGNER’S NAME to open the signature pad. | ||
| + | <br />[[File:Spacer.png]]<br /> | ||
| + | [[File:36.png]] | ||
| + | <br />[[File:Spacer.png]]<br /> | ||
| + | Draw your signature with a finger or stylus. | ||
| + | <br />[[File:Spacer.png]]<br /> | ||
| + | [[File:37.png]] | ||
| + | <br />[[File:Spacer.png]]<br /> | ||
| + | Tap DONE to register your signature and save and link the analysis to the lot number and the fill records for the individual cylinders in the lot (batch). | ||
| + | <br />[[File:Spacer.png]]<br /> | ||
| + | [[File:38.png]] | ||
| + | <br /> | ||
| + | |- | ||
| + | |} | ||
| + | |||
| + | |||
| + | |||
| + | |||
| + | |||
| + | |||
| + | == Gas Analysis on TrackAbout from a Handheld == <!--T:9--> | ||
The screens below are referring to the TAMobile 6 version of the mobile software. | The screens below are referring to the TAMobile 6 version of the mobile software. | ||
*From the handheld computer, the system will ask the user for the appropriate test results based on the gas being filled and the user's location. | *From the handheld computer, the system will ask the user for the appropriate test results based on the gas being filled and the user's location. | ||
| Line 60: | Line 229: | ||
<!--T:12--> | <!--T:12--> | ||
| − | *With some custom software development, a certificate of analysis that includes your logo and other custom layout | + | *With some custom software development, a certificate of analysis that includes your logo and other custom layout requirements can be created using this gas analysis data. |
== Analysis from Fill == <!--T:13--> | == Analysis from Fill == <!--T:13--> | ||
Latest revision as of 15:45, 5 April 2022
| TrackAbout Module | |
|---|---|
| Module Name: | Gas Analysis |
| Short Description | TrackAbout’s Gas Analysis module helps eliminate paperwork by validating, recording, and attaching analysis information to a production record. TrackAbout has a simple user interface to add analysis rules and associate them with the products that need to have these tests performed. |
| Supported In: | TAMobile 5, TAMobile 6 Rugged, TAMobile 6 Desktop, TAMobile Android, TAMobile iOS |
| Business Process: | Production |
| ← Back to list | |
Overview
The TrackAbout Gas Analysis module allows users to enter gas analysis information into a handheld mobile device. The software can be configured to manage a variety of analytes (such as concentration, moisture content, or presence of an odor) and the rules that pertain to each.
From the mobile device, the system will ask the user for the appropriate test results based on the gas being filled and alert the user if the recorded analyte passed validation by displaying either a “pass” or “fail” message. Analysis results are saved and linked to the lot number and fill records of the utilized cylinders.
Set Up
- The first step is to setup the analytes that you will be testing. These are set up through the TrackAbout Website.
- Navigate to List Analyte Types under the TrackAbout Config menu option. NOTE: If you do not have this menu option, you will need to contact TrackAbout Support to enable this feature.
- Click Create New Analyte Type
- Name the Analyte
- Choose whether users should be allow to write in a value for this analyte (TEXT) or if the user should be given a list of drop down values (DROP DOWN).
- Leave the Analyte set to "This analyte is active".
- Click Save.
This is a common list of analytes that each future analysis rule can draw from. Examples of analytes might be:
- Oxygen concentration
- Odor present
- Moisture content
- The next step is to setup the gas analysis rules from the TrackAbout website:
- Navigate to List Analyte Rules under the TrackAbout Config menu option.
- Click Create New Analyte Rule.
- Name the Analyte Rule.
- Select which locations will use this Analyte Rule.
- Choose which Products will be subject to this kind of analysis.
- Add the kinds of Analytes that will be tested for this analysis. The user will be asked to set the acceptable range for values collected during the analysis. Any value that falls outside this set range will be considered a "FAIL".
- Click Save.
Gas Analysis on TrackAbout Mobile 7 (for iOS and Windows)
With Gas Analysis on the TrackAbout Mobile 7 app (for iOS and Windows) you can record the analysis results for a lot (or batch) of gas and know if it meets pre-defined specifications before it is put into stock — all from your mobile device.
![]()
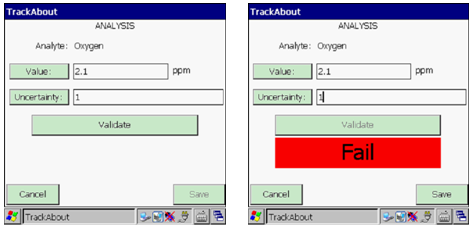
Gas Analysis on TrackAbout from a Handheld
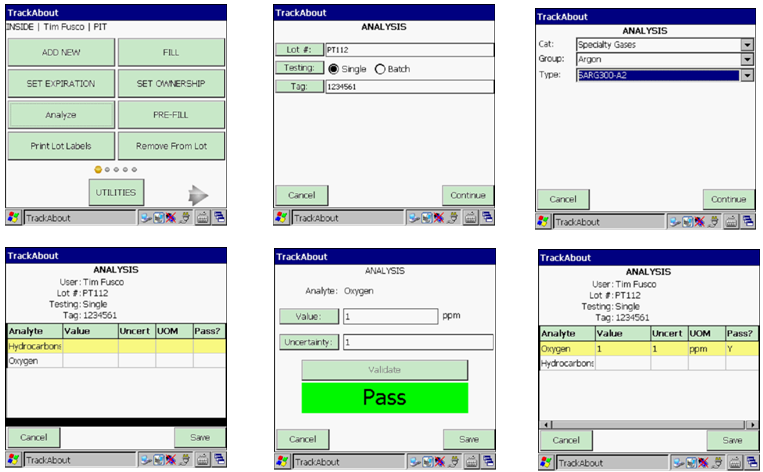
The screens below are referring to the TAMobile 6 version of the mobile software.
- From the handheld computer, the system will ask the user for the appropriate test results based on the gas being filled and the user's location.
- The handheld will alert the user if the gas failed analysis.
- The analysis results are then saved and linked to the lot number and fill records of the cylinders involved.
- With some custom software development, a certificate of analysis that includes your logo and other custom layout requirements can be created using this gas analysis data.
Analysis from Fill
An Analyze button can be added to the end of the Fill action to allow operators to conduct analysis immediately following a Fill without having to choose the Analysis from the main menu.
