Please visit our new TrackAbout Knowledge Base at https://supportkb.trackabout.com for the most-up-to-date documentation on TrackAbout and TrackAbout Mobile.
Difference between revisions of "TAM7 Photo Feature"
(Created page with "<h1>TAM7 Photo Capture</h1> <p>TrackAbout's Photo Capture feature lets you take pictures using the camera on your mobile device and associate them to a record. </p>...") |
|||
| Line 7: | Line 7: | ||
<li> | <li> | ||
<p> | <p> | ||
| − | <p>In TrackAbout Mobile 7, go to <i>Delivery</i> and select or create an order as normal.</p> | + | <p>In TrackAbout Mobile 7, go to <i>Delivery</i> and select or create an order as normal.</p>[[File:Image297.png]]<p style="text-align: center;"> </p> |
| − | |||
| − | |||
| − | |||
</p> | </p> | ||
</li> | </li> | ||
<li> | <li> | ||
<p> | <p> | ||
| − | <p>After you've selected an order and scanned the assets being delivered, click <b>Next</b> to automatically be prompted to add images to the delivery record. </p> | + | <p>After you've selected an order and scanned the assets being delivered, click <b>Next</b> to automatically be prompted to add images to the delivery record. </p>[[File:Image299.png]]<p style="text-align: center;"> </p></li> |
| − | |||
| − | |||
| − | |||
| − | |||
| − | |||
<li> | <li> | ||
<p> | <p> | ||
<p>You can also add an image to the delivery record at any time by opening the bottom-right menu and selecting <i>Delivery Photo</i>.</p> | <p>You can also add an image to the delivery record at any time by opening the bottom-right menu and selecting <i>Delivery Photo</i>.</p> | ||
<p style="text-align: center;"> | <p style="text-align: center;"> | ||
| − | + | [[File:Image304.png]]</p><p style="text-align: center;"> | |
| + | [[File:Image305.png]]</p> | ||
</p> | </p> | ||
</li> | </li> | ||
| Line 32: | Line 25: | ||
<p>To add an image, tap the camera icon to open your camera app, take a picture, and select <b>Use Photo</b> to return to the Photos screen (tap <i>Retake</i> for a do-over). </p> | <p>To add an image, tap the camera icon to open your camera app, take a picture, and select <b>Use Photo</b> to return to the Photos screen (tap <i>Retake</i> for a do-over). </p> | ||
<p style="text-align: center;"> | <p style="text-align: center;"> | ||
| − | + | [[File:Image300.png]]</p> | |
| + | <p style="text-align: center;"> | ||
| + | [[File:Image302.png]]</p> | ||
| + | <p style="text-align: center;"> | ||
| + | [[File:Image301.png]] </p> | ||
<p>You can also use a photo you've already taken by opening the menu in the lower right corner and selecting <i>Pick Existing Photo</i> to access your camera roll. Click <i>Next</i> when you're done to continue with the delivery.</p> | <p>You can also use a photo you've already taken by opening the menu in the lower right corner and selecting <i>Pick Existing Photo</i> to access your camera roll. Click <i>Next</i> when you're done to continue with the delivery.</p> | ||
<p class="note">TrackAbout can be configured to require images be taken for each delivery, or make taking an image optional.</p> | <p class="note">TrackAbout can be configured to require images be taken for each delivery, or make taking an image optional.</p> | ||
| Line 41: | Line 38: | ||
<p>The images you add become part of the asset record, where they can be viewed and if needed, deleted.</p> | <p>The images you add become part of the asset record, where they can be viewed and if needed, deleted.</p> | ||
<p style="text-align: center;"> | <p style="text-align: center;"> | ||
| − | + | [[File:Image296.png]] | |
</p> | </p> | ||
</p> | </p> | ||
| Line 58: | Line 55: | ||
<p>On the Photos screen, tap the camera icon to open your camera app and take a picture. </p> | <p>On the Photos screen, tap the camera icon to open your camera app and take a picture. </p> | ||
<p style="text-align: center;"> | <p style="text-align: center;"> | ||
| − | + | [[File:Image306.png]] | |
| − | |||
</p> | </p> | ||
<p>You can also add an image by opening the lower-right menu on the asset selection screen and selecting <i>Add Photo</i>.</p> | <p>You can also add an image by opening the lower-right menu on the asset selection screen and selecting <i>Add Photo</i>.</p> | ||
</p> | </p> | ||
<p style="text-align: center;"> | <p style="text-align: center;"> | ||
| − | + | [[File:Image307.png]] | |
| − | |||
</p> | </p> | ||
</li> | </li> | ||
| Line 72: | Line 67: | ||
<p>Take a picture and select <b>Use Photo</b> to return to the Photos screen (tap <i>Retake</i> for a do-over). </p> | <p>Take a picture and select <b>Use Photo</b> to return to the Photos screen (tap <i>Retake</i> for a do-over). </p> | ||
<p style="text-align: center;"> | <p style="text-align: center;"> | ||
| − | + | [[File:Image306.png]] | |
| − | + | </p> | |
| − | + | <p style="text-align: center;"> | |
| − | </ | + | [[File:Image310.png]] |
| − | + | </p> | |
| − | + | <p style="text-align: center;"> | |
| + | [[File:Image308.png]] | ||
</p> | </p> | ||
<p>You can also use a photo you've already taken by opening the menu in the lower right corner and selecting <i>Pick Existing Photo</i> to access your camera roll. Click <i>Next</i> when you're done adding photos to continue with the action.</p> | <p>You can also use a photo you've already taken by opening the menu in the lower right corner and selecting <i>Pick Existing Photo</i> to access your camera roll. Click <i>Next</i> when you're done adding photos to continue with the action.</p> | ||
| Line 96: | Line 92: | ||
</p> | </p> | ||
<p style="text-align: center;"> | <p style="text-align: center;"> | ||
| − | + | [[File:Image311.png]] | |
| − | |||
</p> | </p> | ||
</li> | </li> | ||
| Line 104: | Line 99: | ||
<p>Take a picture and select <b>Use Photo</b> to return to the Photos screen (tap <i>Retake</i> for a do-over). </p> | <p>Take a picture and select <b>Use Photo</b> to return to the Photos screen (tap <i>Retake</i> for a do-over). </p> | ||
<p style="text-align: center;"> | <p style="text-align: center;"> | ||
| − | + | [[File:Image312.png]] | |
| − | + | </p> | |
| − | + | <p style="text-align: center;"> | |
| − | </ | + | [[File:Image314.png]] |
| − | + | </p> | |
| − | + | <p style="text-align: center;"> | |
| + | [[File:Image316.png]] | ||
</p> | </p> | ||
<p>You can also use a photo you've already taken by opening the menu in the lower right corner and selecting <i>Pick Existing Photo</i> to access your camera roll. Click <i>DONE</i> when you're done adding photos.</p> | <p>You can also use a photo you've already taken by opening the menu in the lower right corner and selecting <i>Pick Existing Photo</i> to access your camera roll. Click <i>DONE</i> when you're done adding photos.</p> | ||
Latest revision as of 15:58, 8 December 2022
TAM7 Photo Capture
TrackAbout's Photo Capture feature lets you take pictures using the camera on your mobile device and associate them to a record.
Photo Capture is available in Delivery and Flag for / Send to Maintenance actions, and can be incorporated into Generic actions.
Using the Photo Feature in Delivery Actions
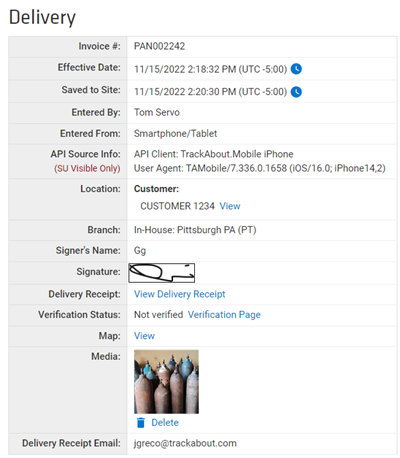
In Delivery Actions, the Photo Feature lets you take a picture and attach it to the delivery record (along with a date, timestamp, and GPS coordinates) as visual proof a delivery was made, or why it couldn’t be.
-
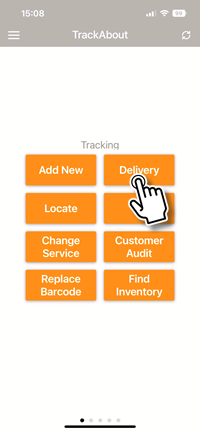
In TrackAbout Mobile 7, go to Delivery and select or create an order as normal.
-
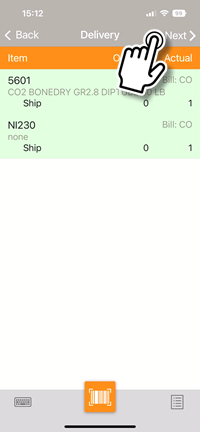
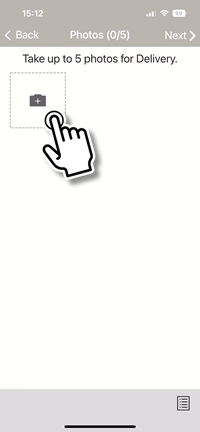
After you've selected an order and scanned the assets being delivered, click Next to automatically be prompted to add images to the delivery record.
-
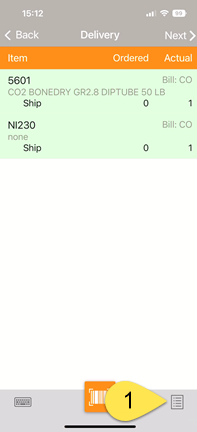
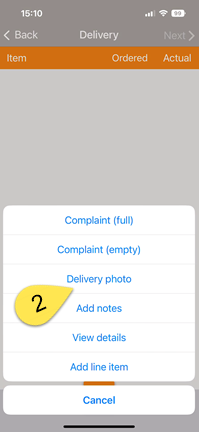
You can also add an image to the delivery record at any time by opening the bottom-right menu and selecting Delivery Photo.
-
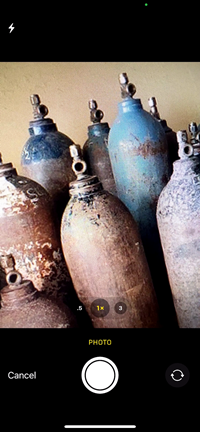
To add an image, tap the camera icon to open your camera app, take a picture, and select Use Photo to return to the Photos screen (tap Retake for a do-over).
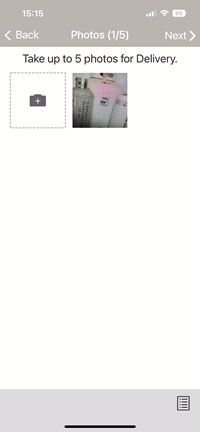
You can also use a photo you've already taken by opening the menu in the lower right corner and selecting Pick Existing Photo to access your camera roll. Click Next when you're done to continue with the delivery.
TrackAbout can be configured to require images be taken for each delivery, or make taking an image optional.
-
The images you add become part of the asset record, where they can be viewed and if needed, deleted.


Using the Photo Feature in Generic Actions
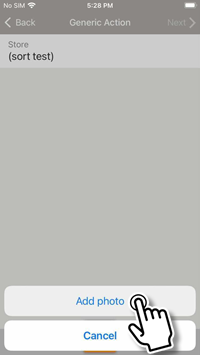
As part of a Generic Actions, Photo Capture lets you take pictures and attach them virtually to an asset. Capture anything from serial numbers to gauge readings, or even record damage, delivery notes, certificates, licenses, or Safety Data Sheets.
-
In TrackAbout Mobile 7 start the generic action and scan an asset to associate the pictures with.
-
On the Photos screen, tap the camera icon to open your camera app and take a picture.
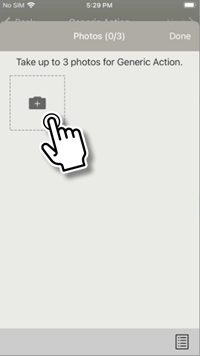
You can also add an image by opening the lower-right menu on the asset selection screen and selecting Add Photo.
-
Take a picture and select Use Photo to return to the Photos screen (tap Retake for a do-over).
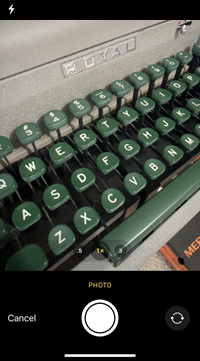
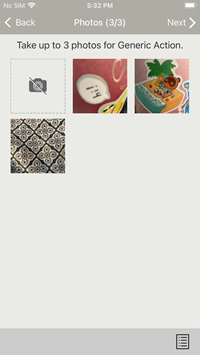
You can also use a photo you've already taken by opening the menu in the lower right corner and selecting Pick Existing Photo to access your camera roll. Click Next when you're done adding photos to continue with the action.
-
The images you add become part of the action record, where they can be viewed and if needed, deleted.


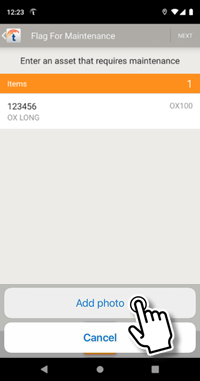
Using the Photo Feature in Flag for / Send to Maintenance
In Flag for Maintenance/Send to Maintenance, Photo Capture lets you take a picture to visually highlight the reason for maintenance.
-
After scanning an asset, add a picture by opening the lower-right menu and selecting Add Photo.
-
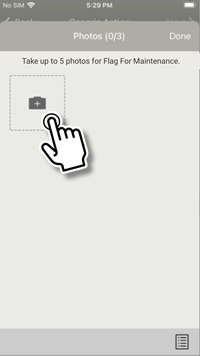
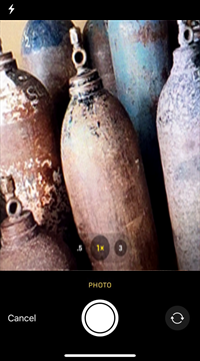
Take a picture and select Use Photo to return to the Photos screen (tap Retake for a do-over).
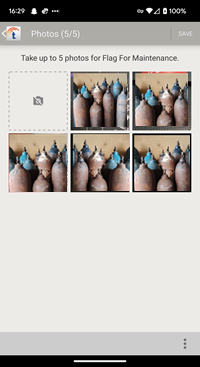
You can also use a photo you've already taken by opening the menu in the lower right corner and selecting Pick Existing Photo to access your camera roll. Click DONE when you're done adding photos.
-
The images you add become part of the action record, where they can be viewed and if needed, deleted.


