Please visit our new TrackAbout Knowledge Base at https://supportkb.trackabout.com for the most-up-to-date documentation on TrackAbout and TrackAbout Mobile.
Difference between revisions of "November 2022 Release Notes"
| (7 intermediate revisions by the same user not shown) | |||
| Line 1: | Line 1: | ||
| − | + | <h2><i>Follow-On Tracking</i> is Now <i>Customer Portal</i></h2> | |
| − | + | <p>Follow-On Tracking is now called Customer Tracking Portal. The Customer Tracking Portal lets you give your customers controlled, web-based access to your TrackAbout system so they can track and view asset information at their locations. For more about Customer Portal, click [https://corp.trackabout.com/modules/customer-tracking-portal here].</p> | |
| − | + | <h2>Photo Feature </h2> | |
| − | + | <p>TrackAbout's new [https://corp.trackabout.com/blog/an-inside-look-at-trackabouts-photo-module Photo Feature] adds the ability to take pictures of assets using the camera on your mobile device in Delivery, Flag for Maintenance/Send to Maintenance, and Generic actions.</p> | |
| − | |||
| − | |||
| − | |||
| − | |||
| − | |||
| − | |||
| − | |||
| − | |||
| − | |||
| − | |||
| − | |||
| − | |||
| − | |||
| − | |||
| − | |||
| − | |||
| − | |||
| − | |||
| − | |||
| − | |||
| − | |||
| − | |||
| − | |||
| − | |||
| − | |||
| − | |||
| − | |||
| − | |||
| − | |||
| − | <h2 | ||
| − | <p>Follow-On Tracking is now called Customer Tracking Portal. The Customer Tracking Portal lets you give your customers controlled, web-based access to your TrackAbout system so they can track and view asset information at their locations. For more about Customer Portal, click | ||
| − | <h2 | ||
| − | <p>TrackAbout's new | ||
<div class="Exampley"> | <div class="Exampley"> | ||
<p class="optionItems"> <b style="font-style: italic;">Delivery</b> The Photo Feature makes managing assets even easier by providing visual proof that a delivery was made, or why it couldn’t be. What better proof of a successful delivery than a photograph that includes a date, timestamp, and GPS coordinates?<br /></p> | <p class="optionItems"> <b style="font-style: italic;">Delivery</b> The Photo Feature makes managing assets even easier by providing visual proof that a delivery was made, or why it couldn’t be. What better proof of a successful delivery than a photograph that includes a date, timestamp, and GPS coordinates?<br /></p> | ||
| Line 41: | Line 8: | ||
<p class="optionItems"><i style="font-weight: bold;">Flag for Maintenance / Send to Maintenance</i> A picture's worth a thousand words. Why describe a problem with an asset when you can show it clearly in a picture?<br /></p> | <p class="optionItems"><i style="font-weight: bold;">Flag for Maintenance / Send to Maintenance</i> A picture's worth a thousand words. Why describe a problem with an asset when you can show it clearly in a picture?<br /></p> | ||
</div> | </div> | ||
| − | <p>The Photo feature is available now in TrackAbout Mobile 7 for both Android and iOS. If you are interested in using the new Photo Feature and learning more about options and pricing, please contact | + | <p>The Photo feature is available now in TrackAbout Mobile 7 for both Android and iOS. If you are interested in using the new Photo Feature and learning more about options and pricing, please contact TrackAbout Support. </p> |
<h3>Using the Photo Feature in Delivery</h3> | <h3>Using the Photo Feature in Delivery</h3> | ||
<ol> | <ol> | ||
<li> | <li> | ||
<p> | <p> | ||
| − | <p>In TrackAbout Mobile 7, go to <i>Delivery</i> and select or create an order as normal.</p>[[File:Image297.png | + | <p>In TrackAbout Mobile 7, go to <i>Delivery</i> and select or create an order as normal.</p>[[File:Image297.png|alt=|border]]</p> |
| − | |||
</p> | </p> | ||
</li> | </li> | ||
| Line 53: | Line 19: | ||
<p> | <p> | ||
<p>After you've selected an order and scanned the assets being delivered, click <b>Next</b> to automatically be prompted to add images to the delivery record. </p> | <p>After you've selected an order and scanned the assets being delivered, click <b>Next</b> to automatically be prompted to add images to the delivery record. </p> | ||
| − | <p style="text-align: center;"> | + | <p style="text-align: center;">[[File:Image299.png|alt=|border]]</p> |
| − | |||
| − | |||
</p> | </p> | ||
</li> | </li> | ||
| Line 61: | Line 25: | ||
<p> | <p> | ||
<p>You can also add an image to the delivery record at any time by opening the bottom-right menu and selecting <i>Delivery Photo</i>.</p> | <p>You can also add an image to the delivery record at any time by opening the bottom-right menu and selecting <i>Delivery Photo</i>.</p> | ||
| − | <p style="text-align: center;"> | + | <p style="text-align: center;">[[File:Image304.png|alt=|border]][[File:Image305.png|alt=|border]]</p> |
| − | |||
</p> | </p> | ||
</li> | </li> | ||
| Line 68: | Line 31: | ||
<p> | <p> | ||
<p>To add an image, tap the camera icon to open your camera app, take a picture, and select <b>Use Photo</b> to return to the Photos screen (tap <i>Retake</i> for a do-over). </p> | <p>To add an image, tap the camera icon to open your camera app, take a picture, and select <b>Use Photo</b> to return to the Photos screen (tap <i>Retake</i> for a do-over). </p> | ||
| − | <p style="text-align: center;"> | + | <p style="text-align: center;">[[File:Image300.png|alt=|border]][[File:Image302.png|alt=|border]][[File:Image301.png|alt=|border]]</p> |
| − | [[File:Image300.png | + | <p> </p> |
| − | [[File:Image302.png | ||
| − | [[File:Image301.png | ||
| − | |||
<p>You can also use a photo you've already taken by opening the menu in the lower right corner and selecting <i>Pick Existing Photo</i> to access your camera roll. Click <i>Next</i> when you're done to continue with the delivery.</p> | <p>You can also use a photo you've already taken by opening the menu in the lower right corner and selecting <i>Pick Existing Photo</i> to access your camera roll. Click <i>Next</i> when you're done to continue with the delivery.</p> | ||
<p class="note">TrackAbout can be configured to require images be taken for each delivery, or make taking an image optional.</p> | <p class="note">TrackAbout can be configured to require images be taken for each delivery, or make taking an image optional.</p> | ||
| Line 81: | Line 41: | ||
<p>The images you add become part of the asset record, where they can be viewed and if needed, deleted.</p> | <p>The images you add become part of the asset record, where they can be viewed and if needed, deleted.</p> | ||
<p style="text-align: center;"> | <p style="text-align: center;"> | ||
| − | + | [[File:Image296.png|alt=|border]] | |
</p> | </p> | ||
</p> | </p> | ||
| Line 97: | Line 57: | ||
<p>On the Photos screen, tap the camera icon to open your camera app and take a picture. </p> | <p>On the Photos screen, tap the camera icon to open your camera app and take a picture. </p> | ||
<p style="text-align: center;"> | <p style="text-align: center;"> | ||
| − | + | [[File:Image306.png|alt=|border]] | |
</p> | </p> | ||
<p>You can also add an image by opening the lower-right menu on the asset selection screen and selecting <i>Add Photo</i>.</p> | <p>You can also add an image by opening the lower-right menu on the asset selection screen and selecting <i>Add Photo</i>.</p> | ||
</p> | </p> | ||
<p style="text-align: center;"> | <p style="text-align: center;"> | ||
| − | + | [[File:Image307.png|alt=|border]] | |
</p> | </p> | ||
</li> | </li> | ||
| Line 109: | Line 69: | ||
<p>Take a picture and select <b>Use Photo</b> to return to the Photos screen (tap <i>Retake</i> for a do-over). </p> | <p>Take a picture and select <b>Use Photo</b> to return to the Photos screen (tap <i>Retake</i> for a do-over). </p> | ||
<p style="text-align: center;"> | <p style="text-align: center;"> | ||
| − | + | [[File:Image306.png|alt=|border]] [[File:Image310.png|alt=|border]] [[File:Image308.png|alt=|border]]</p> | |
<p>You can also use a photo you've already taken by opening the menu in the lower right corner and selecting <i>Pick Existing Photo</i> to access your camera roll. Click <i>Next</i> when you're done adding photos to continue with the action.</p> | <p>You can also use a photo you've already taken by opening the menu in the lower right corner and selecting <i>Pick Existing Photo</i> to access your camera roll. Click <i>Next</i> when you're done adding photos to continue with the action.</p> | ||
</p> | </p> | ||
| Line 124: | Line 84: | ||
<li> | <li> | ||
<p> | <p> | ||
| − | <p>After scanning an asset, | + | <p>After scanning an asset, add a picture by opening the lower-right menu and selecting <i>Add Photo</i>.</p> |
</p> | </p> | ||
<p style="text-align: center;"> | <p style="text-align: center;"> | ||
| − | + | [[File:Image311.png|alt=|border]] | |
</p> | </p> | ||
</li> | </li> | ||
| Line 134: | Line 94: | ||
<p>Take a picture and select <b>Use Photo</b> to return to the Photos screen (tap <i>Retake</i> for a do-over). </p> | <p>Take a picture and select <b>Use Photo</b> to return to the Photos screen (tap <i>Retake</i> for a do-over). </p> | ||
<p style="text-align: center;"> | <p style="text-align: center;"> | ||
| − | + | [[File:Image312.png|alt=|border]] | |
| + | [[File:Image314.png|alt=|border]] | ||
| + | [[File:Image316.png|alt=|border]] | ||
| + | </p> | ||
<p>You can also use a photo you've already taken by opening the menu in the lower right corner and selecting <i>Pick Existing Photo</i> to access your camera roll. Click <i>DONE</i> when you're done adding photos.</p> | <p>You can also use a photo you've already taken by opening the menu in the lower right corner and selecting <i>Pick Existing Photo</i> to access your camera roll. Click <i>DONE</i> when you're done adding photos.</p> | ||
</p> | </p> | ||
| Line 145: | Line 108: | ||
</ol> | </ol> | ||
<p> </p> | <p> </p> | ||
| − | <h2 | + | <h2>Bulk Loading Hard Good Product Codes</h2> |
| − | <p>Now you can easily upload multiple hard good product codes into TrackAbout all at once with | + | <p>Now you can easily upload multiple hard good product codes into TrackAbout all at once with [https://trackabout.com/clt/setup/BulkLoadHardGoodProductCodes.aspx Bulk Load Hard Good Product Codes] (<i>TrackAbout.com</i> <span style="font-family: 'Wingdings 3'">w</span> <i>TrackAbout Config</i> <span style="font-family: 'Wingdings 3'">w</span> <i>Bulk Load Hard Good Product Codes</i>). </p> |
<p style="text-align: center;"> | <p style="text-align: center;"> | ||
| − | + | [[File:Image280.png|alt=|border]] | |
| + | |||
</p> | </p> | ||
<p>Bulk loading hard good product codes is a three-step process:</p> | <p>Bulk loading hard good product codes is a three-step process:</p> | ||
| Line 162: | Line 126: | ||
</li> | </li> | ||
</ol> | </ol> | ||
| − | <p>For full details on the download the template, editing it, and uploading it back into TrackAbout, see the detailed instructions on the | + | <p>For full details on the download the template, editing it, and uploading it back into TrackAbout, see the detailed instructions on the [https://trackabout.com/clt/setup/BulkLoadHardGoodProductCodes.aspx Bulk Load Hard Good Product Codes] page itself. </p> |
<p> </p> | <p> </p> | ||
| − | <h2 | + | <h2>Bulk Edit Custom Properties</h2> |
| − | <p>The new page Bulk Edit Custom Properties tool (<i>TrackAbout.com </i><span style="font-family: 'Wingdings 3'">w</span><i> TrackAbout Config </i><span style="font-family: 'Wingdings 3'">w</span> <i> | + | <p>The new page Bulk Edit Custom Properties tool (<i>TrackAbout.com </i><span style="font-family: 'Wingdings 3'">w</span><i> TrackAbout Config </i><span style="font-family: 'Wingdings 3'">w</span> <i>[https://trackabout.com/clt/setup/bulkEditCustomInfo.aspx Bulk Edit Custom Properties]</i>) lets you view and edit one or more of your custom properties at the same time, by Property Category and Property Type.</p> |
<p class="note">Custom Properties are attributes captured on items like Locations, Customers, Asset Families, and Product Codes, as opposed to Asset Properties, which are attributes like size, capacity, and retest date.</p> | <p class="note">Custom Properties are attributes captured on items like Locations, Customers, Asset Families, and Product Codes, as opposed to Asset Properties, which are attributes like size, capacity, and retest date.</p> | ||
<p style="text-align: center;"> | <p style="text-align: center;"> | ||
| − | + | [[File:Image281.png|alt=|border]] | |
</p> | </p> | ||
<h3>Using Bulk Edit Custom Properties</h3> | <h3>Using Bulk Edit Custom Properties</h3> | ||
| Line 175: | Line 139: | ||
<p>Select a category from the <i style="font-weight: bold;">Custom Property Category</i> drop-down.</p> | <p>Select a category from the <i style="font-weight: bold;">Custom Property Category</i> drop-down.</p> | ||
<p style="text-align: left;"> | <p style="text-align: left;"> | ||
| − | + | [[File:Image282.png|alt=|border]] | |
</p> | </p> | ||
<p>This displays all of the category's property types in the <i>Custom Property Types to Display</i> box, and all of the category's individual custom properties in the <i>Values</i> list below it.</p> | <p>This displays all of the category's property types in the <i>Custom Property Types to Display</i> box, and all of the category's individual custom properties in the <i>Values</i> list below it.</p> | ||
| Line 188: | Line 152: | ||
<p>To edit a single custom property, click the <b>Edit</b> link to open the editing pop-up.</p> | <p>To edit a single custom property, click the <b>Edit</b> link to open the editing pop-up.</p> | ||
<p style="text-align: center;"> | <p style="text-align: center;"> | ||
| − | + | [[File:Image285.png|alt=|border]] | |
</p> | </p> | ||
</p> | </p> | ||
| Line 196: | Line 160: | ||
<p>To edit selected multiple properties at the same time, select the properties to edit by clicking their check-box, and then click <b>Edit Selected Items</b> to open the editing pop-up. </p> | <p>To edit selected multiple properties at the same time, select the properties to edit by clicking their check-box, and then click <b>Edit Selected Items</b> to open the editing pop-up. </p> | ||
<p style="text-align: center;"> | <p style="text-align: center;"> | ||
| − | + | [[File:Image288.png|alt=|border]] | |
</p> | </p> | ||
<p style="text-align: center;"> | <p style="text-align: center;"> | ||
| − | + | [[File:Image290.png|alt=|border]] | |
</p> | </p> | ||
</p> | </p> | ||
| Line 207: | Line 171: | ||
<p>To edit all the properties in the list at the same time, click <b>Select All</b>, then <b>Edit Selected Items</b> to open the editing pop-up.</p> | <p>To edit all the properties in the list at the same time, click <b>Select All</b>, then <b>Edit Selected Items</b> to open the editing pop-up.</p> | ||
<p style="text-align: center;"> | <p style="text-align: center;"> | ||
| − | + | [[File:Image289.png|alt=|border]] | |
</p> | </p> | ||
<p style="text-align: center;"> | <p style="text-align: center;"> | ||
| − | + | [[File:Image290.png|alt=|border]] | |
</p> | </p> | ||
</p> | </p> | ||
| Line 218: | Line 182: | ||
<p>The Editing pop-up lists the values you can edit. Edit the values as needed and click <b>Save</b>. This will change the values as entered for all of the custom properties you selected.</p> | <p>The Editing pop-up lists the values you can edit. Edit the values as needed and click <b>Save</b>. This will change the values as entered for all of the custom properties you selected.</p> | ||
<p style="text-align: center;"> | <p style="text-align: center;"> | ||
| − | + | [[File:Image287.png|alt=|border]] | |
</p> | </p> | ||
<p> </p> | <p> </p> | ||
<p> </p> | <p> </p> | ||
| − | <h2 | + | <h2>TrackAbout.com</h2> |
<ul> | <ul> | ||
<li> | <li> | ||
| Line 229: | Line 193: | ||
<li> | <li> | ||
| − | <p>You can now exclude more than one asset family from appearing on DOT manifests. For help excluding selected asset families from manifests, reach out to | + | <p>You can now exclude more than one asset family from appearing on DOT manifests. For help excluding selected asset families from manifests, reach out to support@trackabout.com.</p> |
</li> | </li> | ||
| Line 235: | Line 199: | ||
<p><b>Linked Exchange</b> — You can now resend Linked Exchange messages to your partners directly from the Record Summary page. If a message can be resent the option to resend appears under <i>Record Options</i>. </p> | <p><b>Linked Exchange</b> — You can now resend Linked Exchange messages to your partners directly from the Record Summary page. If a message can be resent the option to resend appears under <i>Record Options</i>. </p> | ||
<p style="text-align: center;"> | <p style="text-align: center;"> | ||
| − | + | [[File:Image292.png|alt=|border]] | |
</p> | </p> | ||
<p> </p> | <p> </p> | ||
| Line 243: | Line 207: | ||
</ul> | </ul> | ||
<p> </p> | <p> </p> | ||
| − | <h2 | + | <h2>TrackAbout Mobile 7 </h2> |
<ul> | <ul> | ||
<div> | <div> | ||
| Line 250: | Line 214: | ||
<p>Retail and counter sales users and others who use the POD module and make deliveries without a vehicle now have the ability to change their delivery location (<i>Deliver From</i>) and route (<i>Route</i>) through the TAM7 mobile app — no "Truck Driver" permissions needed.</p> | <p>Retail and counter sales users and others who use the POD module and make deliveries without a vehicle now have the ability to change their delivery location (<i>Deliver From</i>) and route (<i>Route</i>) through the TAM7 mobile app — no "Truck Driver" permissions needed.</p> | ||
<p style="text-align: center;"> | <p style="text-align: center;"> | ||
| − | + | [[File:Image293.png|alt=|border]] | |
</p> | </p> | ||
</p> | </p> | ||
| Line 265: | Line 229: | ||
<p class="note">Using this option can make it easier to unload Not-Scanned assets from the truck — it makes Unload Truck resemble Sort Trip/Picking.</p> | <p class="note">Using this option can make it easier to unload Not-Scanned assets from the truck — it makes Unload Truck resemble Sort Trip/Picking.</p> | ||
<p style="text-align: center;"> | <p style="text-align: center;"> | ||
| − | + | [[File:Image295.png|alt=|border]] | |
| − | |||
| − | |||
| − | |||
</p> | </p> | ||
| − | <p | + | <p> If you're interested in enabling this functionality please contact TrackAbout support.</p> |
| + | |||
</li> | </li> | ||
<li> | <li> | ||
| Line 280: | Line 242: | ||
</ul> | </ul> | ||
<p> </p> | <p> </p> | ||
| − | <h2 | + | <h2>API</h2> |
<ul> | <ul> | ||
<li> | <li> | ||
| − | <p><b>GET /orders/pending</b> now returns the branch location a pending order is being delivered from as <tt>originLocation</tt>. For details on /orders/pending, see | + | <p><b>GET /orders/pending</b> now returns the branch location a pending order is being delivered from as <tt>originLocation</tt>. For details on /orders/pending, see [https://www.trackabout.com/api/docs/#!/orders/getorderspending here] </p> |
</li> | </li> | ||
</ul> | </ul> | ||
Latest revision as of 16:49, 2 December 2022
Follow-On Tracking is Now Customer Portal
Follow-On Tracking is now called Customer Tracking Portal. The Customer Tracking Portal lets you give your customers controlled, web-based access to your TrackAbout system so they can track and view asset information at their locations. For more about Customer Portal, click here.
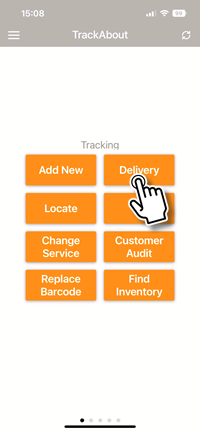
Photo Feature
TrackAbout's new Photo Feature adds the ability to take pictures of assets using the camera on your mobile device in Delivery, Flag for Maintenance/Send to Maintenance, and Generic actions.
Delivery The Photo Feature makes managing assets even easier by providing visual proof that a delivery was made, or why it couldn’t be. What better proof of a successful delivery than a photograph that includes a date, timestamp, and GPS coordinates?
Generic Actions Take pictures as part of a generic action and attach them virtually to an asset. Capture anything from serial numbers to gauge readings, or even record damage, delivery notes, certificates, licenses, or Safety Data Sheets.
Flag for Maintenance / Send to Maintenance A picture's worth a thousand words. Why describe a problem with an asset when you can show it clearly in a picture?
The Photo feature is available now in TrackAbout Mobile 7 for both Android and iOS. If you are interested in using the new Photo Feature and learning more about options and pricing, please contact TrackAbout Support.
Using the Photo Feature in Delivery
-
In TrackAbout Mobile 7, go to Delivery and select or create an order as normal.
-
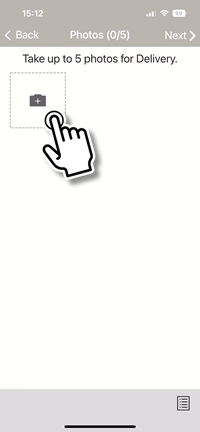
After you've selected an order and scanned the assets being delivered, click Next to automatically be prompted to add images to the delivery record.
-
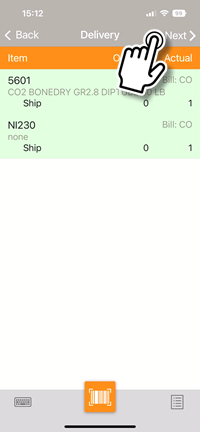
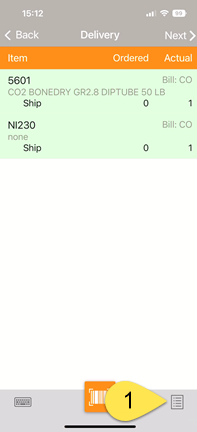
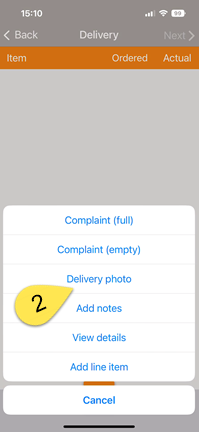
You can also add an image to the delivery record at any time by opening the bottom-right menu and selecting Delivery Photo.
-
To add an image, tap the camera icon to open your camera app, take a picture, and select Use Photo to return to the Photos screen (tap Retake for a do-over).
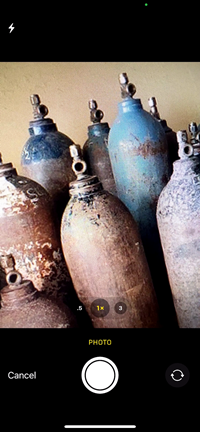
You can also use a photo you've already taken by opening the menu in the lower right corner and selecting Pick Existing Photo to access your camera roll. Click Next when you're done to continue with the delivery.
TrackAbout can be configured to require images be taken for each delivery, or make taking an image optional.
-
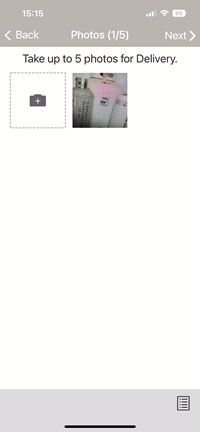
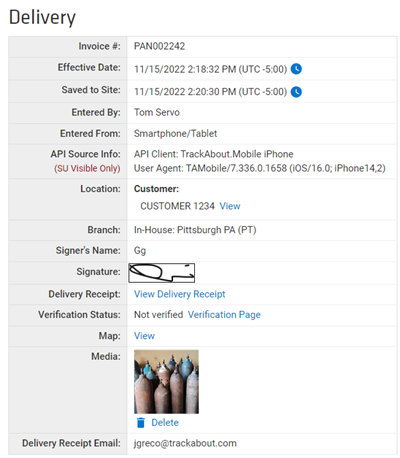
The images you add become part of the asset record, where they can be viewed and if needed, deleted.


Using the Photo Feature in Generic Actions
-
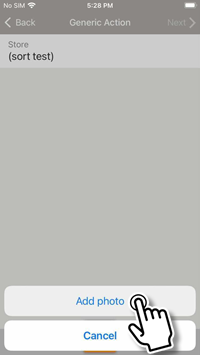
In TrackAbout Mobile 7 start the generic action and scan an asset to associate the pictures with.
-
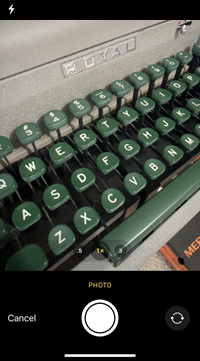
On the Photos screen, tap the camera icon to open your camera app and take a picture.
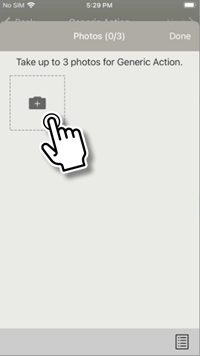
You can also add an image by opening the lower-right menu on the asset selection screen and selecting Add Photo.
-
Take a picture and select Use Photo to return to the Photos screen (tap Retake for a do-over).
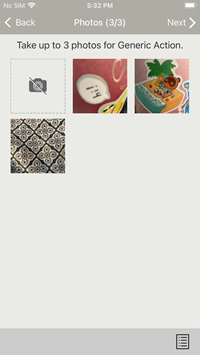
You can also use a photo you've already taken by opening the menu in the lower right corner and selecting Pick Existing Photo to access your camera roll. Click Next when you're done adding photos to continue with the action.
-
The images you add become part of the action record, where they can be viewed and if needed, deleted.


Using the Photo Feature in Flag for / Send to Maintenance
-
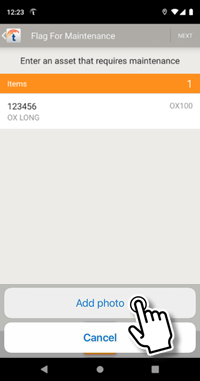
After scanning an asset, add a picture by opening the lower-right menu and selecting Add Photo.
-
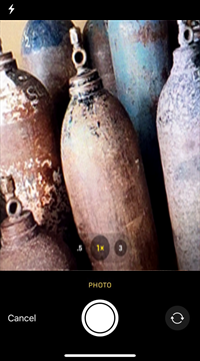
Take a picture and select Use Photo to return to the Photos screen (tap Retake for a do-over).
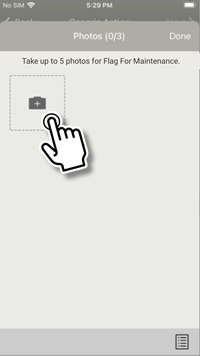
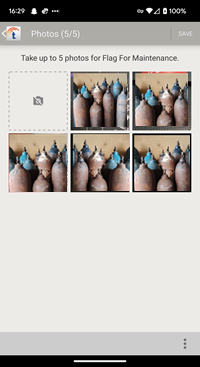
You can also use a photo you've already taken by opening the menu in the lower right corner and selecting Pick Existing Photo to access your camera roll. Click DONE when you're done adding photos.
-
The images you add become part of the action record, where they can be viewed and if needed, deleted.


Bulk Loading Hard Good Product Codes
Now you can easily upload multiple hard good product codes into TrackAbout all at once with Bulk Load Hard Good Product Codes (TrackAbout.com w TrackAbout Config w Bulk Load Hard Good Product Codes).

Bulk loading hard good product codes is a three-step process:
-
Download your custom Hard Good Product Code Excel spreadsheet template from TrackAbout.
-
Add your new hard good product codes and associated data to the spreadsheet in the appropriate columns.
-
Upload the spreadsheet into TrackAbout.
For full details on the download the template, editing it, and uploading it back into TrackAbout, see the detailed instructions on the Bulk Load Hard Good Product Codes page itself.
Bulk Edit Custom Properties
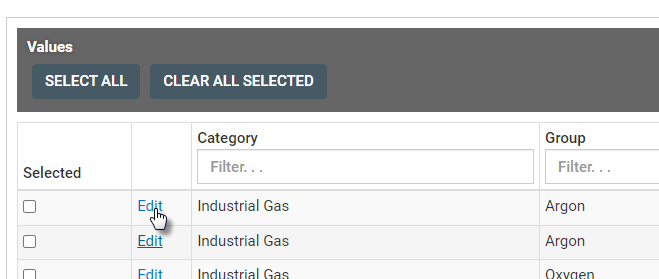
The new page Bulk Edit Custom Properties tool (TrackAbout.com w TrackAbout Config w Bulk Edit Custom Properties) lets you view and edit one or more of your custom properties at the same time, by Property Category and Property Type.
Custom Properties are attributes captured on items like Locations, Customers, Asset Families, and Product Codes, as opposed to Asset Properties, which are attributes like size, capacity, and retest date.

Using Bulk Edit Custom Properties
Selecting a Category
Select a category from the Custom Property Category drop-down.

This displays all of the category's property types in the Custom Property Types to Display box, and all of the category's individual custom properties in the Values list below it.
To filter the Values list so you only see the custom properties in a specific property type, click the property type(s) you want in the Custom Property Types To Display box. Hold down the CTRL key while clicking to select multiple property types.
Editing Custom Properties
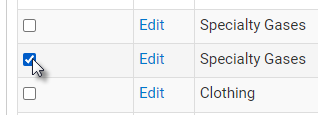
Custom properties can be edited one at a time or in bulk through the Values list.
-
To edit a single custom property, click the Edit link to open the editing pop-up.
-
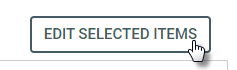
To edit selected multiple properties at the same time, select the properties to edit by clicking their check-box, and then click Edit Selected Items to open the editing pop-up.
-
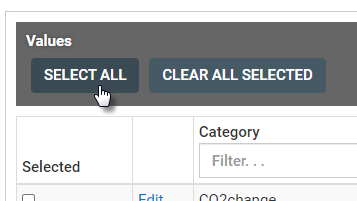
To edit all the properties in the list at the same time, click Select All, then Edit Selected Items to open the editing pop-up.


The Editing pop-up lists the values you can edit. Edit the values as needed and click Save. This will change the values as entered for all of the custom properties you selected.

TrackAbout.com
-
Fill Reports now include not-scanned assets in Lot Number when using Detailed mode.
-
You can now exclude more than one asset family from appearing on DOT manifests. For help excluding selected asset families from manifests, reach out to support@trackabout.com.
-
Linked Exchange — You can now resend Linked Exchange messages to your partners directly from the Record Summary page. If a message can be resent the option to resend appears under Record Options.
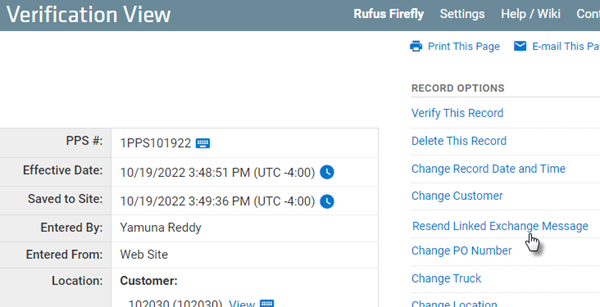
Clicking Resend Linked Exchange Message opens a pop-up asking you to confirm sending the message.
Resent messages contain a link your partner can use to view the record.

TrackAbout Mobile 7
-
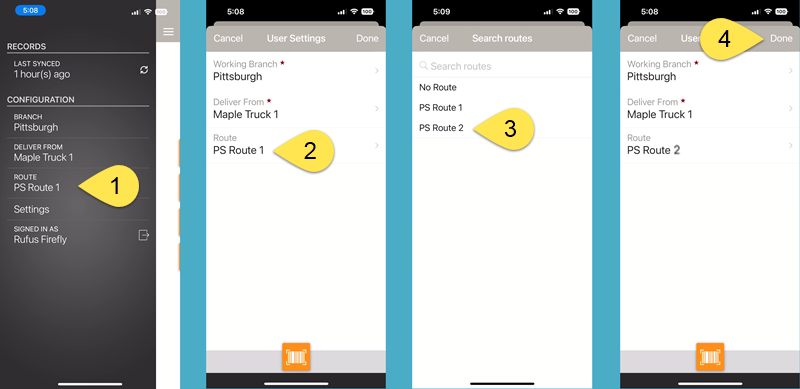
Retail and counter sales users and others who use the POD module and make deliveries without a vehicle now have the ability to change their delivery location (Deliver From) and route (Route) through the TAM7 mobile app — no "Truck Driver" permissions needed.
-
Sort Trip Load — When a trip has line items for containers, scanned quantity now accurately reflects the number of scanned containers.
-
Delivery — Delivery receipts now show the driver's branch location.
-
Unload Truck now has an option to show users how many assets are to be unloaded (Expected) and have been unloaded (Actual) on the Enter Assets screen.
Using this option can make it easier to unload Not-Scanned assets from the truck — it makes Unload Truck resemble Sort Trip/Picking.
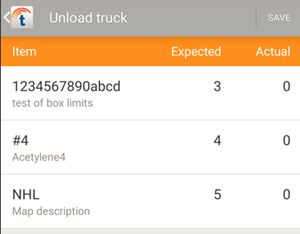
If you're interested in enabling this functionality please contact TrackAbout support.
-
Maintenance now verifies that key fields are populated on assets being scanned into maintenance.
-
Maintenance now automatically assigns an updated product code to an asset when users add or change any Custom Asset Info (CAI) that effects the asset's Product Code.


API
-
GET /orders/pending now returns the branch location a pending order is being delivered from as originLocation. For details on /orders/pending, see here