Please visit our new TrackAbout Knowledge Base at https://supportkb.trackabout.com for the most-up-to-date documentation on TrackAbout and TrackAbout Mobile.
Difference between revisions of "Customers"
| Line 104: | Line 104: | ||
=== Deactivate a Customer === | === Deactivate a Customer === | ||
| − | If a customer has records associated with it, that customer may be deactivated | + | If a customer has records associated with it, that customer may be deactivated. |
| − | |||
| − | |||
| − | |||
| − | |||
Before deactivating a customer, it is recommended that you remove all unique assets from that customer's balance so that your reports remain accurate. There are several ways to remove assets from a customer's balance. Choose the method which best reflects where the assets are. | Before deactivating a customer, it is recommended that you remove all unique assets from that customer's balance so that your reports remain accurate. There are several ways to remove assets from a customer's balance. Choose the method which best reflects where the assets are. | ||
| Line 117: | Line 113: | ||
To deactivate a customer, find the customer and then tap the Deactivate button. | To deactivate a customer, find the customer and then tap the Deactivate button. | ||
| + | |||
| + | Once a customer has been deactivated, it will no longer be available in drop down lists (i.e. to Add a New Order) or reporting. | ||
| + | |||
| + | For customers using integration through our RESTful API endpoints, deactivated customers will only show if the parameters for including deactivated customers are used. Deactivated customers will still show when using the Customer Balances endpoint if the deactivated customer account has a positive balance and will still be included during Rental Invoice generation. | ||
| + | |||
| + | Users will still be able to view deactivated customers, but they will see a message at the top of the Customer Detail screen to indicate that it is no longer active. | ||
You can activate a customer once again by tapping the “Activate” button at the bottom of a Customer’s profile. | You can activate a customer once again by tapping the “Activate” button at the bottom of a Customer’s profile. | ||
Revision as of 16:36, 14 April 2017
Customer List

The Customer List is where you can view all of the customers you have in TrackAbout. You can also add new customers from this page.
- Go to the Customer List page.
- Type “Customer List” in the Jump To box
- Use the menu bar and go to Customers > Customer List
- This page will show you all of the customers in TrackAbout
- Click on the View link to go to the Customer Detail View page
Customer Detail View
The Customer Detail View gives you all the details about a particular customer, and about the assets they have received. It also gives you tools to manage the customer’s balance.

Customer Info
Gives a snapshot of basic customer information, including:

- Customer ID
- Customer Name
- Phone and Shipping Address
- Assets Lost
- Servicing Locations
- Last Delivery Date
Departments

- Lists any child accounts linked to this customer
- Allows you to add, view and edit departments
Audits

- Shows any audits that have been done on the customer.
- Clicking the view link will take you to the audit record.
Customer Reports

- Asset Balance: Shows a summary view of assets at the customer on a specified date.
- Asset List: Shows a list view of assets at the customer on a specified date. This report can be filtered by category, group, type and product code.
- Asset Search: Takes you to the Asset Search page where you can find assets by almost any search topic.
- Inventory Worksheet: This is a printable report you can take to a customer site to take inventory at a customer site.
- Transfer Activity: Shows a summary view of the assets that have been transferred to and from the customer within a specified time period
- Shows any unusual transfer activity for the customer.
- View Balance Changes Details: Shows all the asset transfers in the customer’s history grouped by Asset Type. This can be limited by date.
- View Balance Changes Summary: Shows a summary of balance changes limited by Category, Group and Type.
Additional Configuration

- Transfer Balance to Another Customer: Allows you to transfer the asset balance of the current customer to another customer.
- Reduce Not-Scanned Balance: Allows you to remove not scanned balances.
Add New Customer
- Go to the Add New Customer page.
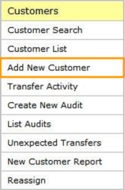
- Type “Add New Customer” in the Jump To box.
- Use the menu bar and go to Customers > Add New Customer.
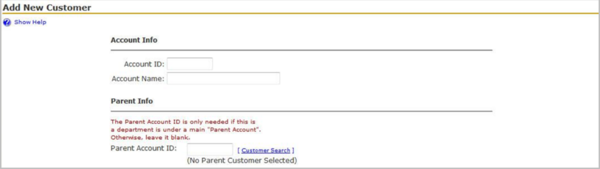
- Enter an Account ID.
- The Account ID is the same as the Customer ID.
- Enter an Account Name: the name of the customer.
- If using parent-child relationships, enter the parent’s ID number.
- Select the primary servicing location (Cedar Rapids).
- You can also secondary servicing locations
- Enter any notes for this customer.
- Click Save.


Customer information stored in TrackAbout should be exactly the same, or as close as possible to that stored in your accounting system. This will help you to compare data from TrackAbout with data in your accounting system, whether you are comparing it manually, or through integration. If you need to change customer information, make sure that it is changed both in your accounting system and in TrackAbout for maximum
consistency.
Adding Customers in Bulk
If you have many customers, you can load these in bulk. To do this:
- Download this template and add your customer information: LoadCustomersTemplate.xlsx
- Save this as a tab-delimited text file
- On the website, use the menu bar and go to Integration > Import Customer Info
- Follow the instructions on the page
Removing Customers
There are two ways to remove a customer
- Delete a Customer
- Deactivate a Customer
Delete a Customer
A customer may be deleted if there are no records associate with that customer.
- From the customer page, tap the Edit button.
- In the Edit Customer page, scroll all the way to the bottom and tap the Delete This Customer button.
NOTE: If there are records associated with the customer, you will get a warning and the customer will not be deleted.
Deactivate a Customer
If a customer has records associated with it, that customer may be deactivated.
Before deactivating a customer, it is recommended that you remove all unique assets from that customer's balance so that your reports remain accurate. There are several ways to remove assets from a customer's balance. Choose the method which best reflects where the assets are.
- Transfer assets from the inactive customer to another customer
- Transfer assets from the inactive customer to a branch location
- Mark all of the unique assets as Lost. Lost assets will not show up in your inventory reporting. If a Lost asset gets scanned at some point in the future, it will again become active and all of its history will remain intact.
- Mark all of the unique assets as Retired. Retired assets will not show up in your inventory reporting. If a Retired asset's barcode number gets scanned at some point in the future, TrackAbout will create a new asset with the same barcode as the Retired asset. The retired asset will remain retired, and all of its history will remain with the retired asset.
To deactivate a customer, find the customer and then tap the Deactivate button.
Once a customer has been deactivated, it will no longer be available in drop down lists (i.e. to Add a New Order) or reporting.
For customers using integration through our RESTful API endpoints, deactivated customers will only show if the parameters for including deactivated customers are used. Deactivated customers will still show when using the Customer Balances endpoint if the deactivated customer account has a positive balance and will still be included during Rental Invoice generation.
Users will still be able to view deactivated customers, but they will see a message at the top of the Customer Detail screen to indicate that it is no longer active.
You can activate a customer once again by tapping the “Activate” button at the bottom of a Customer’s profile.